Administrator’s Installation Guide (on Debian Wheezy)
This is the Administrator’s installation guide on Debian Wheezy.
It describes how to install the whole Synnefo stack on two (2) physical nodes, with minimum configuration. It installs Synnefo from Debian packages, and assumes the nodes run Debian Wheezy. After successful installation, you will have the following services running:
- Identity Management (Astakos)
- Object Storage Service (Pithos)
- Compute Service (Cyclades)
- Image Service (part of Cyclades)
- Network Service (part of Cyclades)
and a single unified Web UI to manage them all.
If you just want to install the Object Storage Service (Pithos), follow the guide and just stop after the “Testing of Pithos” section.
Installation of Synnefo / Introduction
For the rest of the documentation we will refer to the first physical node as “node1” and the second as “node2”. We will also assume that their domain names are “node1.example.com” and “node2.example.com” and their public IPs are “203.0.113.1” and “203.0.113.2” respectively. It is important that the two machines are under the same domain name. In case you choose to follow a private installation you will need to set up a private dns server, using dnsmasq for example. See node1 below for more information on how to do so.
General Prerequisites
These are the general Synnefo prerequisites, that you need on node1 and node2 and are related to all the services (Astakos, Pithos, Cyclades).
To be able to download all Synnefo components you need to add the following lines in your /etc/apt/sources.list file:
and import the repo’s GPG key:
Update your list of packages and continue with the installation:
# apt-get update
From version 0.16 Synnefo is backed by Archipelago and uses it to store all of its data. In this guide, we will use NFS as a storage backend for Archipelago. If you plan to upload more than one basic image, this directory should have at least 50GB of free space. During this guide, we will assume that node1 acts as an NFS server and serves the directory /srv/archip/ to node2 (be sure to set no_root_squash flag). Node2 has this directory mounted under /srv/archip/, too.
Before starting the Synnefo installation, you will need basic third party software to be installed and configured on the physical nodes. We will describe each node’s general prerequisites separately. Any additional configuration, specific to a Synnefo service for each node, will be described at the service’s section.
Finally, it is required for Cyclades and Ganeti nodes to have synchronized system clocks (e.g. by running ntpd).
Node1
General Synnefo dependencies
- apache (http server)
- public certificate
- gunicorn (WSGI http server)
- postgresql (database)
- rabbitmq (message queue)
- ntp (NTP daemon)
- gevent
- dnsmasq (DNS server)
- Archipelago
You can install apache2, postgresql, ntp and rabbitmq by running:
# apt-get install apache2 postgresql ntp rabbitmq-server
To install gunicorn and gevent, run:
# apt-get install gunicorn python-gevent
On node1, we will create our databases, so you will also need the python-psycopg2 package:
# apt-get install python-psycopg2
Database setup
On node1, we create a database called snf_apps, that will host all django apps related tables. We also create the user synnefo and grant him all privileges on the database. We do this by running:
root@node1:~ # su - postgres
postgres@node1:~ $ psql
postgres=# CREATE DATABASE snf_apps WITH ENCODING 'UTF8' LC_COLLATE='C' LC_CTYPE='C' TEMPLATE=template0;
postgres=# CREATE USER synnefo WITH PASSWORD 'example_passw0rd';
postgres=# GRANT ALL PRIVILEGES ON DATABASE snf_apps TO synnefo;
We also create the database snf_pithos needed by the Pithos backend and grant the synnefo user all privileges on the database. This database could be created on node2 instead, but we do it on node1 for simplicity. We will create all needed databases on node1 and then node2 will connect to them.
postgres=# CREATE DATABASE snf_pithos WITH ENCODING 'UTF8' LC_COLLATE='C' LC_CTYPE='C' TEMPLATE=template0;
postgres=# GRANT ALL PRIVILEGES ON DATABASE snf_pithos TO synnefo;
Configure the database to listen to all network interfaces. You can do this by editing the file /etc/postgresql/9.1/main/postgresql.conf and change listen_addresses to '*' :
listen_addresses = '*'
Furthermore, edit /etc/postgresql/9.1/main/pg_hba.conf to allow node1 and node2 to connect to the database. Add the following lines under #IPv4 local connections: :
host                all     all     203.0.113.1/32  md5
host                all     all     203.0.113.2/32  md5
Make sure to substitute “203.0.113.1” and “203.0.113.2” with node1’s and node2’s actual IPs. Now, restart the server to apply the changes:
# /etc/init.d/postgresql restart
Certificate Creation
Node1 will host Cyclades. Cyclades should communicate with the other Synnefo Services and users over a secure channel. In order for the connection to be trusted, the keys provided to Apache below should be signed with a certificate. This certificate should be added to all nodes. In case you don’t have signed keys you can create a self-signed certificate and sign your keys with this. To do so on node1 run:
# apt-get install openvpn
# mkdir /etc/openvpn/easy-rsa
# cp -ai /usr/share/doc/openvpn/examples/easy-rsa/2.0/ /etc/openvpn/easy-rsa
# cd /etc/openvpn/easy-rsa/2.0
# vim vars
In vars you can set your own parameters such as KEY_COUNTRY
# . ./vars
# ./clean-all
Now you can create the certificate
# ./build-ca
The previous will create a ca.crt file in the directory /etc/openvpn/easy-rsa/2.0/keys. Copy this file under /usr/local/share/ca-certificates/ directory and run :
# update-ca-certificates
to update the records. You will have to do the following on node2 as well.
Now you can create the keys and sign them with the certificate
# ./build-key-server node1.example.com
This will create a 01.pem and a node1.example.com.key files in the /etc/openvpn/easy-rsa/2.0/keys directory. Copy these in /etc/ssl/certs/ and /etc/ssl/private/ respectively and use them in the apache2 configuration file below instead of the defaults.
Apache2 setup
Create the file /etc/apache2/sites-available/synnefo containing the following:
<VirtualHost *:80>
    ServerName node1.example.com

    RewriteEngine On
    RewriteCond %{THE_REQUEST} ^.*(\\r|\\n|%0A|%0D).* [NC]
    RewriteRule ^(.*)$ - [F,L]
    RewriteRule (.*) https://%{HTTP_HOST}%{REQUEST_URI}
</VirtualHost>
Create the file /etc/apache2/sites-available/synnefo-ssl containing the following:
<IfModule mod_ssl.c>
<VirtualHost _default_:443>
    ServerName node1.example.com

    Alias /static "/usr/share/synnefo/static"

    #  SetEnv no-gzip
    #  SetEnv dont-vary

   AllowEncodedSlashes On

   RequestHeader set X-Forwarded-Protocol "https"

<Proxy * >
    Order allow,deny
    Allow from all
</Proxy>

    SetEnv                proxy-sendchunked
    SSLProxyEngine        off
    ProxyErrorOverride    off

    ProxyPass        /static !
    ProxyPass        / http://localhost:8080/ retry=0
    ProxyPassReverse / http://localhost:8080/

    RewriteEngine On
    RewriteCond %{THE_REQUEST} ^.*(\\r|\\n|%0A|%0D).* [NC]
    RewriteRule ^(.*)$ - [F,L]

    SSLEngine on
    SSLCertificateFile    /etc/ssl/certs/ssl-cert-snakeoil.pem
    SSLCertificateKeyFile /etc/ssl/private/ssl-cert-snakeoil.key
</VirtualHost>
</IfModule>
Now enable sites and modules by running:
# a2enmod ssl
# a2enmod rewrite
# a2dissite default
# a2ensite synnefo
# a2ensite synnefo-ssl
# a2enmod headers
# a2enmod proxy_http
Note
This isn’t really needed, but it’s a good security practice to disable directory listing in apache:
# a2dismod autoindex
Warning
Do NOT start/restart the server yet. If the server is running:
# /etc/init.d/apache2 stop
Message Queue setup
The message queue will run on node1, so we need to create the appropriate rabbitmq user. The user is named synnefo and gets full privileges on all exchanges:
# rabbitmqctl add_user synnefo "example_rabbitmq_passw0rd"
# rabbitmqctl set_permissions synnefo ".*" ".*" ".*"
We do not need to initialize the exchanges. This will be done automatically, during the Cyclades setup.
System user/group setup
Before we continue with the installation we have to mention the user and group that our components will run as. In short Archipelago (and specifically the archipelago package) creates the archipelago system user and group while synnefo (and specifically the snf-common package) creates the synnefo system user and group.
This guide uses NFS for Archipelago’s physical storage backend. Archipelago must have permissions to write on the shared dir. As explained below the shared dir will be owned by archipelago:synnefo. Due to NFS restrictions, all nodes nodes must have common uid for the archipelago user and common gid for the synnefo group. So before any Synnefo installation, we create them here in advance. We assume that ids 200 and 300 are available across all nodes.
# addgroup --system --gid 200 synnefo
# adduser --system --uid 200 --gid 200 --no-create-home \
    --gecos Synnefo synnefo

# addgroup --system --gid 300 archipelago
# adduser --system --uid 300 --gid 300 --no-create-home \
    --gecos Archipelago archipelago
NFS data directory setup
The Archipelago directory must be shared via NFS. As mentioned in the General Prerequisites section, there should be a directory called /srv/archip/ with blocks, maps, and locks subdirectories visible by both nodes. To create it run:
# mkdir /srv/archip/
# cd /srv/archip/
# mkdir -p {maps,blocks,locks}
Currently Archipelago is the only one that needs to have access to the backing store. We could have the whole NFS isolated from Synnefo (owned by archipelago:archipelago with 640 access permissions) but we choose not to (e.g. some future extension could require access to the backing store directly from Synnefo). Thus we set the ownership to archipelago:synnefo and access permissions to g+ws.
# cd /srv/archip
# chown archipelago:synnefo {maps,blocks,locks}
# chmod 770 {maps,blocks,locks}
# chmod g+s {maps,blocks,locks}
In order to install the NFS server, run:
# apt-get install rpcbind nfs-kernel-server
Now edit /etc/exports and add the following line:
/srv/archip/ 203.0.113.2(rw,no_root_squash,sync,subtree_check)
Once done, run:
# /etc/init.d/nfs-kernel-server restart
Archipelago setup
To install Archipelago, run:
root@node1:~ # apt-get install archipelago archipelago-ganeti
root@node1:~ # apt-get install blktap-archipelago-utils blktap-dkms
Now edit /etc/archipelago/archipelago.conf and tweak the following settings:
- USER: Let Archipelago run as archipelago user (default)
- GROUP: Let Archipelago run as synnefo group (archipelago by default)
- SEGMENT_SIZE: Adjust shared memory segment size according to your machine’s RAM. The default value is 2GB which in some situations might exceed your machine’s physical RAM. Consult also with Archipelago administrator’s guide for an appropriate value.
Adjust the following settings of blockerb and blockerm to point to their corresponding directories.
In section blockerb set:
- archip_dir: /srv/archip/blocks
In section blockerm set:
- archip_dir: /srv/archip/maps
- lock_dir: /srv/archip/locks
Finally, start Archipelago:
root@node1:~ # /etc/init.d/archipelago start
DNS server setup
If your machines are not under the same domain name you have to set up a dns server. In order to set up a dns server using dnsmasq do the following:
# apt-get install dnsmasq
Then edit your /etc/hosts file as follows:
203.0.113.1     node1.example.com
203.0.113.2     node2.example.com
dnsmasq will serve any IPs/domains found in /etc/hosts.
There is a “bug” in libevent 2.0.5 , where if you have multiple nameservers in your /etc/resolv.conf, libevent will round-robin against them. To avoid this, you must use a single nameserver for all your needs. Edit your /etc/resolv.conf to include your dns server:
nameserver 203.0.113.1
Because of the aforementioned bug, you can’t specify more than one DNS servers in your /etc/resolv.conf. In order for dnsmasq to serve domains not in /etc/hosts, edit /etc/dnsmasq.conf and change the line starting with #resolv-file= to:
resolv-file=/etc/external-dns
Now create the file /etc/external-dns and specify any extra DNS servers you want dnsmasq to query for domains, e.g., 8.8.8.8:
nameserver 8.8.8.8
In the /etc/dnsmasq.conf file, you can also specify the listen-address and the interface you would like dnsmasq to listen to.
Finally, restart dnsmasq:
# /etc/init.d/dnsmasq restart
You are now ready with all general prerequisites concerning node1. Let’s go to node2.
Node2
General Synnefo dependencies
- apache (http server)
- gunicorn (WSGI http server)
- postgresql (database)
- ntp (NTP daemon)
- gevent
- certificates
- dnsmasq (DNS server)
- NFS directory mount
- Archipelago
You can install the above by running:
# apt-get install apache2 postgresql ntp
To install gunicorn and gevent, run:
# apt-get install gunicorn python-gevent
Node2 will connect to the databases on node1, so you will also need the python-psycopg2 package:
# apt-get install python-psycopg2
Database setup
All databases have been created and setup on node1, so we do not need to take any action here. From node2, we will just connect to them. When you get familiar with the software you may choose to run different databases on different nodes, for performance/scalability/redundancy reasons, but those kind of setups are out of the purpose of this guide.
Apache2 setup
Create the file /etc/apache2/sites-available/synnefo containing the following:
<VirtualHost *:80>
    ServerName node2.example.com

    RewriteEngine On
    RewriteCond %{THE_REQUEST} ^.*(\\r|\\n|%0A|%0D).* [NC]
    RewriteRule ^(.*)$ - [F,L]
    RewriteRule (.*) https://%{HTTP_HOST}%{REQUEST_URI}
</VirtualHost>
Create the file synnefo-ssl under /etc/apache2/sites-available/ containing the following:
<IfModule mod_ssl.c>
<VirtualHost _default_:443>
    ServerName node2.example.com

    Alias /static "/usr/share/synnefo/static"

    SetEnv no-gzip
    SetEnv dont-vary
    AllowEncodedSlashes On

    RequestHeader set X-Forwarded-Protocol "https"

    <Proxy * >
        Order allow,deny
        Allow from all
    </Proxy>

    SetEnv                proxy-sendchunked
    SSLProxyEngine        off
    ProxyErrorOverride    off

    ProxyPass        /static !
    ProxyPass        / http://localhost:8080/ retry=0
    ProxyPassReverse / http://localhost:8080/

    SSLEngine on
    SSLCertificateFile    /etc/ssl/certs/ssl-cert-snakeoil.pem
    SSLCertificateKeyFile /etc/ssl/private/ssl-cert-snakeoil.key
</VirtualHost>
</IfModule>
As in node1, enable sites and modules by running:
# a2enmod ssl
# a2enmod rewrite
# a2dissite default
# a2ensite synnefo
# a2ensite synnefo-ssl
# a2enmod headers
# a2enmod proxy_http
Note
This isn’t really needed, but it’s a good security practice to disable directory listing in apache:
# a2dismod autoindex
Warning
Do NOT start/restart the server yet. If the server is running:
# /etc/init.d/apache2 stop
Acquire certificate
Copy the certificate you created before on node1 (ca.crt) under the directory /usr/local/share/ca-certificate and run:
# update-ca-certificates
to update the records.
Installation of Archipelago
To install Archipelago, run:
root@node2:~ # apt-get install archipelago archipelago-ganeti
root@node2:~ # apt-get install blktap-archipelago-utils blktap-dkms
In order to configure Archipelago, the shared data directory must be set up. Make sure to mount the Archipelago directory after installing the Archipelago package.
First install the package nfs-common by running:
root@node2:~ # apt-get install nfs-common
Now create the directory /srv/archip/ and mount the remote directory to it:
root@node2:~ # mkdir /srv/archip/
root@node2:~ # mount -t nfs 203.0.113.1:/srv/archip/ /srv/archip/
Now edit /etc/archipelago/archipelago.conf and tweak the following settings:
- SEGMENT_SIZE: Adjust shared memory segment size according to your machine’s RAM. The default value is 2GB which in some situations might exceed your machine’s physical RAM. Consult also with Archipelago administrator’s guide for an appropriate value.
Adjust the following settings of blockerb and blockerm to point to their corresponding directories.
In section blockerb set:
- archip_dir: /srv/archip/blocks
In section blockerm set:
- archip_dir: /srv/archip/maps
- lock_dir: /srv/archip/locks
Finally, start Archipelago:
root@node2:~ # /etc/init.d/archipelago start
DNS Setup
Add the following line in /etc/resolv.conf file
nameserver 203.0.113.1
to inform the node about the new DNS server.
As mentioned before, this should be the only nameserver entry in /etc/resolv.conf.
We are now ready with all general prerequisites for node2. Now that we have finished with all general prerequisites for both nodes, we can start installing the services. First, let’s install Astakos on node1.
Installation of Astakos on node1
To install Astakos, grab the package from our repository (make sure you made the additions needed in your /etc/apt/sources.list file and updated, as described previously), by running:
# apt-get install snf-astakos-app
Configuration of Astakos
Gunicorn setup
Copy the file /etc/gunicorn.d/synnefo.example to /etc/gunicorn.d/synnefo, to make it a valid gunicorn configuration file:
# cp /etc/gunicorn.d/synnefo.example /etc/gunicorn.d/synnefo
Warning
Do NOT start the server yet, because it won’t find the synnefo.settings module. We will start the server after successfully installing of Astakos. If the server is running:
# /etc/init.d/gunicorn stop
Conf Files
After Astakos is successfully installed, you will find the directory /etc/synnefo and some configuration files inside it. The files contain commented configuration options, which are the default options. While installing new snf-* components, new configuration files will appear inside the directory. In this guide (and for all services), we will edit only the minimum necessary configuration options, to reflect our setup. Everything else will remain as is.
After getting familiar with Synnefo, you will be able to customize the software as you wish and fits your needs. Many options are available, to empower the administrator with extensively customizable setups.
For the snf-webproject component (installed as an Astakos dependency), we need the following:
Edit /etc/synnefo/10-snf-webproject-database.conf. You will need to uncomment and edit the DATABASES block to reflect our database:
DATABASES = {
 'default': {
     # 'postgresql_psycopg2', 'postgresql','mysql', 'sqlite3' or 'oracle'
     'ENGINE': 'django.db.backends.postgresql_psycopg2',
     # ATTENTION: This *must* be the absolute path if using sqlite3.
     # See: http://docs.djangoproject.com/en/dev/ref/settings/#name
     'NAME': 'snf_apps',
     'USER': 'synnefo',                      # Not used with sqlite3.
     'PASSWORD': 'example_passw0rd',         # Not used with sqlite3.
     # Set to empty string for localhost. Not used with sqlite3.
     'HOST': '203.0.113.1',
     # Set to empty string for default. Not used with sqlite3.
     'PORT': '5432',
 }
}
Edit /etc/synnefo/10-snf-webproject-deploy.conf. Uncomment and edit SECRET_KEY. This is a Django specific setting which is used to provide a seed in secret-key hashing algorithms. Set this to a random string of your choice and keep it private:
SECRET_KEY = 'sy6)mw6a7x%n)-example_secret_key#zzk4jo6f2=uqu!1o%)'
For Astakos specific configuration, edit the following options in /etc/synnefo/20-snf-astakos-app-settings.conf :
ASTAKOS_COOKIE_DOMAIN = '.example.com'

ASTAKOS_BASE_URL = 'https://node1.example.com/astakos'
The ASTAKOS_COOKIE_DOMAIN should be the base url of our domain (for all services). ASTAKOS_BASE_URL is the Astakos top-level URL. Appending an extra path (/astakos here) is recommended in order to distinguish components, if more than one are installed on the same machine.
Note
For the purpose of this guide, we don’t enable recaptcha authentication. If you would like to enable it, you have to edit the following options:
ASTAKOS_RECAPTCHA_PUBLIC_KEY = 'example_recaptcha_public_key!@#$%^&*('
ASTAKOS_RECAPTCHA_PRIVATE_KEY = 'example_recaptcha_private_key!@#$%^&*('
ASTAKOS_RECAPTCHA_USE_SSL = True
ASTAKOS_RECAPTCHA_ENABLED = True
For the ASTAKOS_RECAPTCHA_PUBLIC_KEY and ASTAKOS_RECAPTCHA_PRIVATE_KEY go to https://www.google.com/recaptcha/admin/create and create your own pair.
Then edit /etc/synnefo/20-snf-astakos-app-cloudbar.conf :
CLOUDBAR_LOCATION = 'https://node1.example.com/static/im/cloudbar/'

CLOUDBAR_SERVICES_URL = 'https://node1.example.com/astakos/ui/get_services'

CLOUDBAR_MENU_URL = 'https://node1.example.com/astakos/ui/get_menu'
Those settings have to do with the black cloudbar endpoints and will be described in more detail later on in this guide. For now, just edit the domain to point at node1 which is where we have installed Astakos.
If you are an advanced user and want to use the Shibboleth Authentication method, read the relative section.
Email delivery configuration
Many of the Astakos operations require the server to notify service users and administrators via email. e.g. right after the signup process, the service sents an email to the registered email address containing an verification url. After the user verifies the email address, Astakos once again needs to notify administrators with a notice that a new account has just been verified.
More specifically Astakos sends emails in the following cases
- An email containing a verification link after each signup process.
- An email to the people listed in ACCOUNT_NOTIFICATIONS_RECIPIENTS setting after each email verification if ASTAKOS_MODERATION setting is True. The email notifies administrators that an additional action is required in order to activate the user.
- A welcome email to the user email and a notification to ACCOUNT_NOTIFICATIONS_RECIPIENTS right after each account activation.
- Feedback messages submitted from Astakos contact view and Astakos feedback API endpoint are sent to contacts listed in FEEDBACK_NOTIFICATIONS_RECIPIENTS setting.
- Project application request notifications to people included in PROJECT_NOTIFICATIONS_RECIPIENTS setting.
- Notifications after each project members action (join request, membership accepted/declined etc.) to project members or project owners.
Astakos uses the Django internal email delivering mechanism to send email notifications. A simple configuration, using an external smtp server to deliver messages, is shown below. Alter the following example to meet your smtp server characteristics. Notice that the smtp server is needed for a proper installation.
Edit /etc/synnefo/00-snf-common-admins.conf:
EMAIL_HOST = "mysmtp.server.example.com"
EMAIL_HOST_USER = "<smtpuser>"
EMAIL_HOST_PASSWORD = "<smtppassword>"

# this gets appended in all email subjects
EMAIL_SUBJECT_PREFIX = "[example.com] "

# Address to use for outgoing emails
DEFAULT_FROM_EMAIL = "server@example.com"

# Email where users can contact for support. This is used in html/email
# templates.
CONTACT_EMAIL = "server@example.com"

# The email address that error messages come from
SERVER_EMAIL = "server-errors@example.com"
Notice that since email settings might be required by applications other than Astakos, they are defined in a different configuration file than the one previously used to set Astakos specific settings.
Refer to Django documentation for additional information on available email settings.
As referred in the previous section, based on the operation that triggers an email notification, the recipients list differs. For convenience (and backward compatibility), Astakos defines three service teams (administrators, managers and helpdesk) and send the above notifications to these teams in a preconfigured way (ie. project notifications are sent to the members of managers and helpdesk teams). These settings are located in 00-snf-common-admins.conf:
ADMINS = (('Admin name', 'admin@example.com'),
          ('Admin2 name', 'admin2@example.com))
MANAGERS = (('Manager name', 'manager@example.com'),)
HELPDESK = (('Helpdesk user name', 'helpdesk@example.com'),)
Alternatively, it may be convenient to send e-mails to a file, instead of an actual smtp server, using the file backend. Do so by creating a configuration file /etc/synnefo/99-local.conf including the folowing:
EMAIL_BACKEND = 'django.core.mail.backends.filebased.EmailBackend'
EMAIL_FILE_PATH = '/tmp/app-messages'
Enable Pooling
This section can be bypassed, but we strongly recommend you apply the following, since they result in a significant performance boost.
Synnefo includes a pooling DBAPI driver for PostgreSQL, as a thin wrapper around Psycopg2. This allows independent Django requests to reuse pooled DB connections, with significant performance gains.
To use, first monkey-patch psycopg2. For Django, run this before the DATABASES setting in /etc/synnefo/10-snf-webproject-database.conf:
from synnefo.lib.db.pooled_psycopg2 import monkey_patch_psycopg2
monkey_patch_psycopg2()
Since we are running with greenlets, we should modify psycopg2 behavior, so it works properly in a greenlet context:
from synnefo.lib.db.psyco_gevent import make_psycopg_green
make_psycopg_green()
Use the Psycopg2 driver as usual. For Django, this means using django.db.backends.postgresql_psycopg2 without any modifications. To enable connection pooling, pass a nonzero synnefo_poolsize option to the DBAPI driver, through DATABASES.OPTIONS in Django.
All the above will result in an /etc/synnefo/10-snf-webproject-database.conf file that looks like this:
# Monkey-patch psycopg2
from synnefo.lib.db.pooled_psycopg2 import monkey_patch_psycopg2
monkey_patch_psycopg2()

# If running with greenlets
from synnefo.lib.db.psyco_gevent import make_psycopg_green
make_psycopg_green()

DATABASES = {
 'default': {
     # 'postgresql_psycopg2', 'postgresql','mysql', 'sqlite3' or 'oracle'
     'ENGINE': 'django.db.backends.postgresql_psycopg2',
     'OPTIONS': {'synnefo_poolsize': 8},

     # ATTENTION: This *must* be the absolute path if using sqlite3.
     # See: http://docs.djangoproject.com/en/dev/ref/settings/#name
     'NAME': 'snf_apps',
     'USER': 'synnefo',                      # Not used with sqlite3.
     'PASSWORD': 'example_passw0rd',         # Not used with sqlite3.
     # Set to empty string for localhost. Not used with sqlite3.
     'HOST': '203.0.113.1',
     # Set to empty string for default. Not used with sqlite3.
     'PORT': '5432',
 }
}
Database Initialization
After configuration is done, we initialize the database by running:
# snf-manage syncdb
At this example we don’t need to create a django superuser, so we select [no] to the question. After a successful sync, we run the migration needed for Astakos:
# snf-manage migrate im
# snf-manage migrate quotaholder_app
# snf-manage migrate oa2
Then, we load the pre-defined user groups
# snf-manage loaddata groups
Services Registration
When the database is ready, we need to register the services. The following command will ask you to register the standard Synnefo components (Astakos, Cyclades and Pithos) along with the services they provide. Note that you have to register at least Astakos in order to have a usable authentication system. For each component, you will be asked to provide two URLs: its base URL and its UI URL.
The former is the location where the component resides; it should equal the <component_name>_BASE_URL as specified in the respective component settings. For example, the base URL for Astakos would be https://node1.example.com/astakos.
The latter is the URL that appears in the Cloudbar and leads to the component UI. If you want to follow the default setup, set the UI URL to <base_url>/ui/ where base_url the component’s base URL as explained before. (You can later change the UI URL with snf-manage component-modify <component_name> --ui-url new_ui_url.)
The command will also register automatically the resource definitions offered by the services.
# snf-component-register
Note
This command is equivalent to running the following series of commands; it registers the three components in Astakos and then in each host it exports the respective service definitions, copies the exported json file to the Astakos host, where it finally imports it:
astakos-host$ snf-manage component-add astakos --base-url astakos_base_url --ui-url astakos_ui_url
astakos-host$ snf-manage component-add cyclades --base-url cyclades_base_url --ui-url cyclades_ui_url
astakos-host$ snf-manage component-add pithos --base-url pithos_base_url --ui-url pithos_ui_url
astakos-host$ snf-manage service-export-astakos > astakos.json
astakos-host$ snf-manage service-import --json astakos.json
cyclades-host$ snf-manage service-export-cyclades > cyclades.json
# copy the file to astakos-host
astakos-host$ snf-manage service-import --json cyclades.json
pithos-host$ snf-manage service-export-pithos > pithos.json
# copy the file to astakos-host
astakos-host$ snf-manage service-import --json pithos.json
Notice that in this installation astakos and cyclades are in node1 and pithos is in node2.
Setting Default Base Quota for Resources
All resources are registered with unlimited quota. We now have to restrict the limit on the resources we wish to control. We can set the default quota a new user is offered by the system (system default) with
# snf-manage resource-modify <resource-name> --system-default <value>
When specifying storage or memory size limits you can append a unit to the value, i.e. 10240 MB, 10 GB etc. Use the special value inf, if you don’t want to restrict a resource.
Setting Resource Visibility
It is possible to control whether a resource is visible to the users via the API or the Web UI. The default value for these options is denoted inside the default resource definitions. Note that the system always checks and enforces resource quota, regardless of their visibility. You can inspect the current status with:
# snf-manage resource-list
You can change a resource’s visibility with:
# snf-manage resource-modify <resource> --api-visible=True (or --ui-visible=True)
Register pithos view as an OAuth 2.0 client
Starting from Synnefo version 0.15, the pithos view, in order to get access to the data of a protected pithos resource, has to be granted authorization for the specific resource by astakos.
During the authorization grant procedure, it has to authenticate itself with astakos since the latter has to prevent serving requests by unknown/unauthorized clients.
Each oauth 2.0 client is identified by a client identifier (client_id). Moreover, the confidential clients are authenticated via a password (client_secret). Then, each client has to declare at least a redirect URI so that astakos will be able to validate the redirect URI provided during the authorization code request. If a client is trusted (like a pithos view), astakos grants access on behalf of the resource owner, otherwise the resource owner has to be asked.
To register the pithos view as an OAuth 2.0 client in astakos, we have to run the following command:
snf-manage oauth2-client-add pithos-view --secret=<secret> --is-trusted --url https://node2.example.com/pithos/ui/view
Servers Initialization
Finally, we initialize the servers on node1:
root@node1:~ # /etc/init.d/gunicorn restart
root@node1:~ # /etc/init.d/apache2 restart
We have now finished the Astakos setup. Let’s test it now.
Testing of Astakos
Open your favorite browser and go to:
http://node1.example.com/astakos
If this redirects you to https://node1.example.com/astakos/ui/ and you can see the “welcome” door of Astakos, then you have successfully setup Astakos.
Let’s create our first user. At the homepage click the “CREATE ACCOUNT” button and fill all your data at the sign up form. Then click “SUBMIT”. You should now see a green box on the top, which informs you that you made a successful request and the request has been sent to the administrators. So far so good, let’s assume that you created the user with username user@example.com.
Now we need to activate that user. Return to a command prompt at node1 and run:
root@node1:~ # snf-manage user-list
This command should show you a list with only one user; the one we just created. This user should have an id with a value of 1 and flag “active” set to False. Now run:
root@node1:~ # snf-manage user-modify 1 --verify --accept
This verifies the user email and activates the user. When running in production, the activation is done automatically with different types of moderation, that Astakos supports. You can see the moderation methods (by invitation, whitelists, matching regexp, etc.) at the Astakos specific documentation. In production, you can also manually activate a user, by sending him/her an activation email. See how to do this at the User activation section.
Now let’s go back to the homepage. Open http://node1.example.com/astakos/ui/ with your browser again. Try to sign in using your new credentials. If the Astakos menu appears and you can see your profile, then you have successfully setup Astakos.
Let’s continue to install Pithos now.
Installation of Pithos on node2
To install Pithos, grab the packages from our repository (make sure you made the additions needed in your /etc/apt/sources.list file, as described previously), by running:
# apt-get install snf-pithos-app snf-pithos-backend
Now, install the pithos web interface:
# apt-get install snf-pithos-webclient
This package provides the standalone Pithos web client. The web client is the web UI for Pithos and will be accessible by clicking “Pithos” on the Astakos interface’s cloudbar, at the top of the Astakos homepage.
Configuration of Pithos
Gunicorn setup
Copy the file /etc/gunicorn.d/synnefo.example to /etc/gunicorn.d/synnefo, to make it a valid gunicorn configuration file (as happened for node1):
# cp /etc/gunicorn.d/synnefo.example /etc/gunicorn.d/synnefo
Warning
Do NOT start the server yet, because it won’t find the synnefo.settings module. We will start the server after successful installation of Pithos. If the server is running:
# /etc/init.d/gunicorn stop
Conf Files
After Pithos is successfully installed, you will find the directory /etc/synnefo and some configuration files inside it, as you did in node1 after installation of Astakos. Here, you will not have to change anything that has to do with snf-common or snf-webproject. Everything is set at node1. You only need to change settings that have to do with Pithos. Specifically:
Edit /etc/synnefo/20-snf-pithos-app-settings.conf. There you need to set this options:
ASTAKOS_AUTH_URL = 'https://node1.example.com/astakos/identity/v2.0'

PITHOS_BASE_URL = 'https://node2.example.com/pithos'
PITHOS_BACKEND_DB_CONNECTION = 'postgresql://synnefo:example_passw0rd@node1.example.com:5432/snf_pithos'

PITHOS_SERVICE_TOKEN = 'pithos_service_token22w'
The PITHOS_BACKEND_DB_CONNECTION option tells to the Pithos app where to find the Pithos backend database. Above we tell Pithos that its database is snf_pithos at node1 and to connect as user synnefo with password example_passw0rd. All those settings where setup during node1’s “Database setup” section.
The ASTAKOS_AUTH_URL option informs the Pithos app where Astakos is. The Astakos service is used for user management (authentication, quotas, etc.)
The PITHOS_BASE_URL setting must point to the top-level Pithos URL.
The PITHOS_SERVICE_TOKEN is the token used for authentication with Astakos. It can be retrieved by running on the Astakos node (node1 in our case):
# snf-manage component-list
The token has been generated automatically during the Pithos service registration.
The PITHOS_OAUTH2_CLIENT_CREDENTIALS setting is used by the pithos view in order to authenticate itself with astakos during the authorization grant procedure and it should contain the credentials issued for the pithos view in the pithos view registration step.
The PITHOS_UPDATE_MD5 option by default disables the computation of the object checksums. This results to improved performance during object uploading. However, if compatibility with the OpenStack Object Storage API is important then it should be changed to True.
Then edit /etc/synnefo/20-snf-pithos-webclient-cloudbar.conf, to connect the Pithos web UI with the Astakos web UI (through the top cloudbar):
CLOUDBAR_LOCATION = 'https://node1.example.com/static/im/cloudbar/'
CLOUDBAR_SERVICES_URL = 'https://node1.example.com/astakos/ui/get_services'
CLOUDBAR_MENU_URL = 'https://node1.example.com/astakos/ui/get_menu'
The CLOUDBAR_LOCATION tells the client where to find the Astakos common cloudbar.
The CLOUDBAR_SERVICES_URL and CLOUDBAR_MENU_URL options are used by the Pithos web client to get from Astakos all the information needed to fill its own cloudbar. So we put our Astakos deployment urls there.
Pooling and Greenlets
Pithos is pooling-ready without the need of further configuration, because it doesn’t use a Django DB. It pools HTTP connections to Astakos and Pithos backend objects for access to the Pithos DB.
However, as in Astakos, since we are running with Greenlets, it is also recommended to modify psycopg2 behavior so it works properly in a greenlet context. This means adding the following lines at the top of your /etc/synnefo/10-snf-webproject-database.conf file:
from synnefo.lib.db.psyco_gevent import make_psycopg_green
make_psycopg_green()
Pithos gunicorn configuration
We also need to adjust Pithos gunicorn configuration in order to integrate with Archipelago. The file, as mentioned above, is located at /etc/gunicorn.d/synnefo.
As of version 0.16 Pithos is backed by Archipelago. Pithos integrates with Archipelago via a shared memory segment that is used to communicate with the various Archipelago components. For more information regarding the Archipelago internal architecture consult with the Archipelago administrator’s guide
Furthermore, we have to set the --config=/etc/synnefo/gunicorn-hooks/gunicorn-archipelago.py option.
The file should look something like this:
CONFIG = {
 'mode': 'django',
 'environment': {
   'DJANGO_SETTINGS_MODULE': 'synnefo.settings',
 },
 'working_dir': '/etc/synnefo',
 'user': 'synnefo',
 'group': 'synnefo',
 'args': (
   '--bind=127.0.0.1:8080',
   '--workers=4',
   '--worker-class=gevent',
   '--config=/etc/synnefo/gunicorn-hooks/gunicorn-archipelago.py',
   '--log-level=debug',
   '--timeout=43200'
 ),
}
Stamp Database Revision
Pithos uses the alembic database migrations tool.
After a successful installation, we should stamp it at the most recent revision, so that future migrations know where to start upgrading in the migration history.
root@node2:~ # pithos-migrate stamp head
Servers Initialization
After configuration is done, we initialize the servers on node2:
root@node2:~ # /etc/init.d/gunicorn restart
root@node2:~ # /etc/init.d/apache2 restart
You have now finished the Pithos setup. Let’s test it now.
Testing of Pithos
Open your browser and go to the Astakos homepage:
http://node1.example.com/astakos
Login, and you will see your profile page. Now, click the “Pithos” link on the top black cloudbar. If everything was setup correctly, this will redirect you to:
https://node2.example.com/ui
and you will see the blue interface of the Pithos application. Click the orange “Upload” button and upload your first file. If the file gets uploaded successfully, then this is your first sign of a successful Pithos installation. Go ahead and experiment with the interface to make sure everything works correctly.
You can also use the Pithos clients to sync data from your Windows PC or MAC.
If you don’t stumble on any problems, then you have successfully installed Pithos, which you can use as a standalone File Storage Service.
If you would like to do more, such as:
- Spawning VMs
- Spawning VMs from Images stored on Pithos
- Uploading your custom Images to Pithos
- Spawning VMs from those custom Images
- Registering existing Pithos files as Images
- Connect VMs to the Internet
- Create Private Networks
- Add VMs to Private Networks
please continue with the rest of the guide.
Kamaki
Kamaki is an Openstack API client library and command line interface with custom extentions specific to Synnefo.
Kamaki Installation and Configuration
To install Kamaki run:
# apt-get install kamaki
Now, visit
https://node1.example.com/astakos/ui/
log in and click on API access. Scroll all the way to the bottom of the page, click on the orange Download your .kamakirc button and save the file as .kamakirc in your home directory.
That’s all, Kamaki is now configured and you can start using it. For a list of commands, see the official documentantion.
Cyclades Prerequisites
Before proceeding with the Cyclades installation, make sure you have successfully set up Astakos and Pithos first, because Cyclades depends on them. If you don’t have a working Astakos and Pithos installation yet, please return to the top of this guide.
Besides Astakos and Pithos, you will also need a number of additional working prerequisites, before you start the Cyclades installation.
Ganeti
Ganeti handles the low level VM management for Cyclades, so Cyclades requires a working Ganeti installation at the backend. Please refer to the ganeti documentation for all the gory details. A successful Ganeti installation concludes with a working GANETI-MASTER and a number of GANETI-NODEs.
The above Ganeti cluster can run on different physical machines than node1 and node2 and can scale independently, according to your needs.
For the purpose of this guide, we will assume that the GANETI-MASTER runs on node1 and is VM-capable. Also, node2 is a GANETI-NODE and is Master-capable and VM-capable too.
We highly recommend that you read the official Ganeti documentation, if you are not familiar with Ganeti.
Ganeti Prerequisites
You’re gonna need the lvm2, vlan and bridge-utils packages, so run:
# apt-get install lvm2 vlan bridge-utils
Ganeti requires FQDN. To properly configure your nodes please see this.
Ganeti requires an extra available IP and its FQDN e.g., 203.0.113.100 and ganeti.node1.example.com. Add this IP to your DNS server configuration, as explained above.
Also, Ganeti will need a volume group with the same name e.g., ganeti across all nodes, of at least 20GiB. To create the volume group, run:
# pvcreate /dev/sdb1
# vgcreate ganeti /dev/sdb1
Substitute sdb1 with an available partition in your node. If you don’t have an available partition you can create a file with dd and mount it as a loop device:
# dd if=/dev/zero of=gntvg bs=1 count=0 seek=25G
# losetup /dev/loop0 gntvg
Then substitute /dev/sdb1 with /dev/loop0 on pvcreate and vgcreate commands. For more information, see this.
Moreover, node1 and node2 must have the same dsa, rsa keys and authorised_keys under /root/.ssh/ for password-less root ssh between each other. To generate said keys, run:
# ssh-keygen -t rsa
Now copy the generated keys to both nodes under /root/.ssh and add the public key to the /root/.ssh/authorized_keys file:
# cat /root/.ssh/id_rsa.pub >> /root/.ssh/authorized_keys
For more information on how to generate and use keys, see this.
In the following sections, we assume that the public interface of all nodes is eth0 and there are two extra interfaces eth1 and eth2, which can also be vlans on your primary interface e.g., eth0.1 and eth0.2 in case you don’t have multiple physical interfaces. To create such interfaces, run:
# vconfig add eth0 1
# vconfig add eth0 2
For information on how to create vlans, please see this.
Finally, setup two bridges on the host machines (e.g: br1/br2 on eth1/eth2 respectively):
# brctl addbr br1
# brctl addbr br2
# brctl addif br1 eth0.1
# brctl addif br2 eth0.2
For more information on bridges read this.
Ganeti Installation and Initialization
We assume that Ganeti will use the KVM hypervisor. To install KVM, run on all Ganeti nodes:
# apt-get install qemu-kvm
It’s time to install Ganeti. We recommend using our Ganeti package version:
2.10.7+snap1+b64v1+ext1+lockfix1+ifdown1+qmp1+bpo1-1~wheezy
Let’s briefly explain each patch set:
- snap extends snapshot support for the ext disk template (separate LU)
- b64 saves networks’ bitarrays in a more compact representation
- ext
- allows arbitrary params to reach kvm command (i.e. cache overrides disk_cache hvparam, heads and secs define the disk’s geometry)
- lockfix is a workaround for Issue #621
- ifdown cleans up node’s configuration upon instance migration/shutdown
- qmp replace HMP with QMP commands during hotplug
- bpo is a set of patches backported from later branches
- Make name and uuid Disk attributes reach bdev (2.11)
- IDiskParams fixes (2.11)
- Proper support for the –cdrom option (2.12)
- Add migration capabilities as an hvparam (2.13)
- Convert hv_kvm to a package (2.12)
- Extend QMP support (2.12)
- Add access to IDiskParams (2.13)
- Support userspace access for ExtStorage (2.13)
- Allow NICs with routed mode and no IP (2.13)
- Add support for KVM multiqueue virtio-net (2.12)
- Support Snapshot() for the ExtStorage interface (2.13)
- Support disk hotplug even with chroot or SM (2.13)
- Some refactor wrt NICs at the HV level (2.12)
To install Ganeti run:
# apt-get install snf-ganeti ganeti2
Ganeti will make use of drbd. To enable this and make the configuration permanent you have to do the following :
# modprobe drbd minor_count=255 usermode_helper=/bin/true
# echo 'drbd minor_count=255 usermode_helper=/bin/true' >> /etc/modules
Then run on node1:
root@node1:~ # gnt-cluster init --enabled-hypervisors=kvm --no-ssh-init \
                --no-etc-hosts --vg-name=ganeti --nic-parameters link=br1 \
                --default-iallocator hail \
                --hypervisor-parameters kvm:kernel_path=,vnc_bind_address=0.0.0.0 \
                --specs-nic-count min=0,max=16 \
                --master-netdev eth0 ganeti.node1.example.com

root@node1:~ # gnt-node add --no-ssh-key-check --master-capable=yes \
                --vm-capable=yes node2.example.com
root@node1:~ # gnt-cluster modify --disk-parameters=drbd:metavg=ganeti
root@node1:~ # gnt-group modify --disk-parameters=drbd:metavg=ganeti default
br1 will be the default interface for any newly created VMs.
You can verify that the ganeti cluster is successfully setup, by running on the GANETI-MASTER (in our case node1):
# gnt-cluster verify
snf-image
Installation
For Cyclades to be able to launch VMs from specified Images, you need the snf-image OS Definition installed on all VM-capable Ganeti nodes. This means we need snf-image on node1 and node2. You can do this by running on both nodes:
# apt-get install snf-image snf-pithos-backend python-psycopg2
snf-image also needs the snf-pithos-backend <snf-pithos-backend>, to be able to handle image files stored on Pithos. It also needs python-psycopg2 to be able to access the Pithos database. This is why, we also install them on all VM-capable Ganeti nodes.
You must set the the PITHCAT_UMASK setting of snf-image to 007. On the file /etc/default/snf-image uncomment or create the relevant setting and set its value to 007.
Warning
snf-image uses curl for handling URLs. This means that it will not work out of the box if you try to use URLs served by servers which do not have a valid certificate. In case you haven’t followed the guide’s directions about the certificates, in order to circumvent this you should edit the file /etc/default/snf-image. Change # CURL="curl" to CURL="curl -k" on every node.
Warning
If you are using qemu-kvm from wheezy-backports, note that the official 2.1.0 version has a ACPI regression bug (see here). This bug has reached the Debian qemu-kvm 2.1+dfsg-2~bpo70+2 package found in wheezy-backports and is triggered by snf-image. Until a newer package is out, you can workaround it by editing the file /etc/default/snf-image and changing # KVM="kvm" to KVM="qemu-system-x86_64 -enable-kvm -machine pc-i440fx-2.0,accel=kvm" on every node.
Configuration
snf-image supports native access to Images stored on Pithos. This means that it can talk directly to the Pithos backend, without the need of providing a public URL. More details, are described in the next section.
If you have installed your Ganeti cluster on different nodes than node1 and node2 make sure that /srv/archip/ is visible by all of them and Archipelago is installed and configured properly.
If you would like to use Images that are also/only stored locally, you need to save them under IMAGE_DIR, however this guide targets Images stored only on Pithos.
Testing
You can test that snf-image is successfully installed by running on the GANETI-MASTER (in our case node1):
# gnt-os diagnose
This should return valid for snf-image.
If you are interested to learn more about snf-image’s internals (and even use it alongside Ganeti without Synnefo), please see here for information concerning installation instructions, documentation on the design and implementation, and supported Image formats.
Actual Images for snf-image
Now that snf-image is installed successfully we need to provide it with some Images. snf-image supports Images stored in extdump, ntfsdump or diskdump format. We recommend the use of the diskdump format. For more information about snf-image Image formats see here.
snf-image also supports three (3) different locations for the above Images to be stored:
For the purpose of this guide, we will use the Debian Wheezy Base Image found on the official snf-image page. The image is of type diskdump. We will store it in our new Pithos installation.
To do so, do the following:
- Download the Image from the official snf-image page.
- Upload the Image to your Pithos installation, either using the Pithos Web UI or the command line client Kamaki.
To upload the file using Kamaki, run:
# kamaki file upload debian_base-7.0-x86_64.diskdump pithos
Once the Image is uploaded successfully, download the Image’s metadata file from the official snf-image page. You will need it, for spawning a VM from Ganeti, in the next section.
Of course, you can repeat the procedure to upload more Images, available from the official snf-image page.
Spawning a VM from a Pithos Image, using Ganeti
Now, it is time to test our installation so far. So, we have Astakos and Pithos installed, we have a working Ganeti installation, the snf-image definition installed on all VM-capable nodes, a Debian Wheezy Image on Pithos and Kamaki installed and configured. Make sure you also have the metadata file for this image.
To spawn a VM from a Pithos file, we need to know:
- The mapfile name of the file
- The size of the file
If you uploaded the file with Kamaki as described above, run on the Astakos node:
# snf-manage user-list
to get a list of users. Then run the following:
# snf-manage user-show 1
where 1 is the id of the user that uploaded the image, as retrieved by the previous command. This will output the user’s uuid (among others).
Then on the Pithos node run the following:
# snf-manage file-show <user uuid> pithos debian_base-7.0-x86_64.diskdump
Replace pithos and debian_base-7.0-x86_64.diskdump with the container and filename you used, when uploading the file. This will output the following info (among others): the name of the pithos mapfile (mapfile field) and the size of the image (bytes field).
Run on the GANETI-MASTER’s (node1) command line:
# gnt-instance add -o snf-image+default --os-parameters \
                   img_passwd=my_vm_example_passw0rd,img_format=diskdump,img_id="pithosmap://<mapfile>/<Size>",img_properties='{"OSFAMILY":"linux"\,"ROOT_PARTITION":"1"}' \
                   -t plain --disk 0:size=2G --no-name-check --no-ip-check \
                   testvm1
In the above command:
img_passwd: the arbitrary root password of your new instance
img_format: set to diskdump to reflect the type of the uploaded Image
img_id: If you want to deploy an Image stored on Pithos (our case), this should have the format pithosmap://<HashMap>/<size>:
- HashMap: the map of the file
- size: the size of the file, same size as reported in ls -l filename
- img_properties: taken from the metadata file. Used only the two mandatory
properties OSFAMILY and ROOT_PARTITION. Learn more
If the gnt-instance add command returns successfully, then run:
# gnt-instance info testvm1 | grep "console connection"
to find out where to connect using VNC. If you can connect successfully and can login to your new instance using the root password my_vm_example_passw0rd, then everything works as expected and you have your new Debian Base VM up and running.
If gnt-instance add fails, make sure that snf-image is correctly configured to access the Pithos database and the Pithos backend data (newer versions require UUID instead of a username). Another issue you may encounter is that in relatively slow setups, you may need to raise the default HELPER_*_TIMEOUTS in /etc/default/snf-image. Also, make sure you gave the correct img_id and img_properties. If gnt-instance add succeeds but you cannot connect, again find out what went wrong. Do NOT proceed to the next steps unless you are sure everything works till this point.
If everything works, you have successfully connected Ganeti with Pithos. Let’s move on to networking now.
Networking Setup Overview
This part is deployment-specific and must be customized based on the specific needs of the system administrator. Synnefo supports a lot of different networking configurations in the backend (spanning from very simple to more advanced), which are not in the scope of this guide.
In this section, we’ll describe the simplest scenario, which will enable the VMs to have access to the public Internet and also access to arbitrary private networks.
At the end of this section the networking setup on the two nodes will look like this:
snf-network
snf-network is a set of custom scripts, that perform all the necessary actions, so that VMs have a working networking configuration.
Install snf-network on all Ganeti nodes:
# apt-get install snf-network
Then, in /etc/default/snf-network set:
MAC_MASK=ff:ff:f0:00:00:00
nfdhcpd
nfdhcpd is an NFQUEUE based daemon, answering DHCP requests and running locally on every Ganeti node. Its leases file, gets automatically updated by snf-network and information provided by Ganeti.
# apt-get install python-nfqueue=0.4+physindev-1~wheezy
# apt-get install nfdhcpd
Edit /etc/nfdhcpd/nfdhcpd.conf to reflect your network configuration. At least, set the dhcp_queue variable to 42 and the nameservers variable to your DNS IP/s (the one running dnsmasq for instance or you can use Google’s DNS server 8.8.8.8). Restart the server on all nodes:
# /etc/init.d/nfdhcpd restart
In order for nfdhcpd to receive the VMs requests, we have to mangle all DHCP traffic coming from the corresponding interfaces. To accomplish that run:
# iptables -t mangle -A PREROUTING -p udp -m udp --dport 67 -j NFQUEUE --queue-num 42
and append it to your /etc/rc.local.
You can check which clients are currently served by nfdhcpd by running:
# kill -SIGUSR1 `cat /var/run/nfdhcpd/nfdhcpd.pid`
When you run the above, then check /var/log/nfdhcpd/nfdhcpd.log.
Public Network Setup
In the following section, we’ll guide you through a very basic network setup. This assumes the following:
- Node1 has access to the public network via eth0.
- Node1 will become a NAT server for the VMs.
- All nodes have br1/br2 dedicated for the VMs’ public/private traffic.
- VMs’ public network is 10.0.0.0/24 with gateway 10.0.0.1.
Setting up the NAT server on node1
To setup the NAT server on node1, run:
# ip addr add 10.0.0.1/24 dev br1
# iptables -t nat -A POSTROUTING -o eth0 -j MASQUERADE
# echo 1 > /proc/sys/net/ipv4/ip_forward
and append it to your /etc/rc.local.
Testing the Public Networks
First add the network in Ganati:
# gnt-network add --network=10.0.0.0/24 --gateway=10.0.0.1 --tags=nfdhcpd test-net-public
Then, provide connectivity mode and link to the network:
# gnt-network connect --nic-parameters mode=bridged,link=br1 test-net-public
Now, it is time to test that the backend infrastracture is correctly setup for the Public Network. We will add a new VM, almost the same way we did it on the previous testing section. However, now we’ll also add one NIC, configured to be managed from our previously defined network.
Fetch the Debian Old Base image locally (in all nodes), by running:
# wget https://cdn.synnefo.org/debian_base-7.0-x86_64.diskdump -O /var/lib/snf-image/debian_base-7.0-x86_64.diskdump
Also in all nodes, bring all br* interfaces up:
# ifconfig br1 up
# ifconfig br2 up
Finally, run on the GANETI-MASTER (node1):
# gnt-instance add -o snf-image+default --os-parameters \
                   img_passwd=my_vm_example_passw0rd,img_format=diskdump,img_id=debian_base-7.0-x86_64,img_properties='{"OSFAMILY":"linux"\,"ROOT_PARTITION":"1"}' \
                   -t plain --disk 0:size=2G --no-name-check --no-ip-check \
                   --net 0:ip=pool,network=test-net-public \
                   testvm2
The following things should happen:
- Ganeti creates a tap interface.
- snf-network bridges the tap interface to br1 and updates nfdhcpd state.
- nfdhcpd serves 10.0.0.2 IP to the interface of testvm2.
Now try to ping the outside world e.g., www.synnefo.org from inside the VM (connect to the VM using VNC as before).
Make sure everything works as expected, before proceeding with the Private Networks setup.
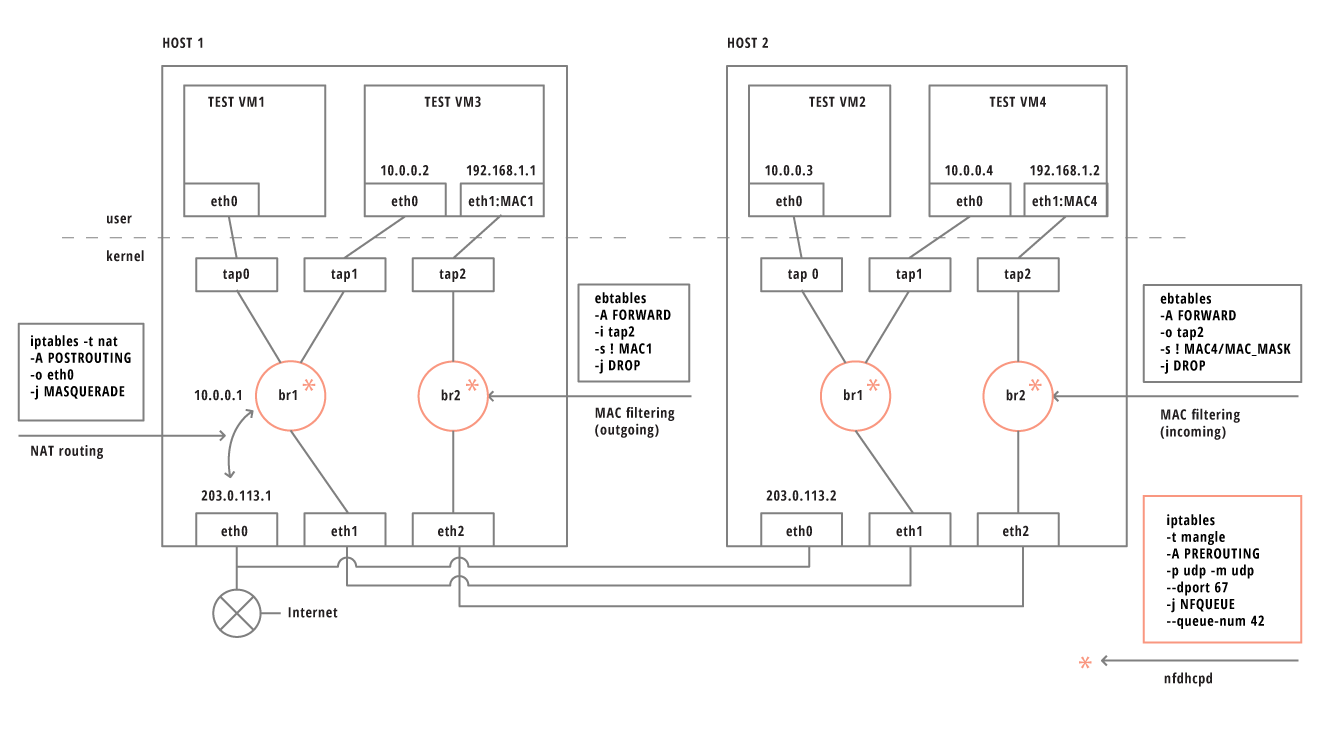
Private Networks Setup
In this section, we’ll describe a basic network configuration, that will provide isolated private networks to the end-users. All private network traffic, will pass through br2 and isolation will be guaranteed with a specific set of ebtables rules.
Testing the Private Networks
We’ll create two instances and connect them to the same Private Network. This means that the instances will have a second NIC connected to the br2.
# gnt-network add --network=192.168.1.0/24 --mac-prefix=aa:00:55 --tags=nfdhcpd,private-filtered test-net-prv-mac
# gnt-network connect --nic-parameters mode=bridged,link=br2 test-net-prv-mac

# gnt-instance add -o snf-image+default --os-parameters \
                   img_passwd=my_vm_example_passw0rd,img_format=diskdump,img_id=debian_base-7.0-x86_64,img_properties='{"OSFAMILY":"linux"\,"ROOT_PARTITION":"1"}' \
                   -t plain --disk 0:size=2G --no-name-check --no-ip-check \
                   --net 0:ip=pool,network=test-net-public \
                   --net 1:ip=pool,network=test-net-prv-mac \
                   -n node1.example.com testvm3

# gnt-instance add -o snf-image+default --os-parameters \
                   img_passwd=my_vm_example_passw0rd,img_format=diskdump,img_id=debian_base-7.0-x86_64,img_properties='{"OSFAMILY":"linux"\,"ROOT_PARTITION":"1"}' \
                   -t plain --disk 0:size=2G --no-name-check --no-ip-check \
                   --net 0:ip=pool,network=test-net-public \
                   --net 1:ip=pool,network=test-net-prv-mac -n node2 \
                   testvm4
Above, we create two instances with the first NIC connected to the internet and their second NIC connected to a MAC filtered private Network. Now, connect to the instances using VNC and make sure everything works as expected:
- The instances have access to the public internet through their first eth interface (eth0), which has been automatically assigned a “public” IP.
- eth1 will have mac prefix aa:00:55
- On testvm3 ping 192.168.1.2
If everything works as expected, then you have finished the Network Setup at the backend for both types of Networks (Public & Private).
Cyclades Ganeti tools
In order for Ganeti to be connected with Cyclades later on, we need the Cyclades Ganeti tools available on all Ganeti nodes (node1 & node2 in our case). You can install them by running in both nodes:
# apt-get install snf-cyclades-gtools
This will install the following:
- snf-ganeti-eventd (daemon to publish Ganeti related messages on RabbitMQ)
- snf-progress-monitor (used by snf-image to publish progress messages)
Configure snf-cyclades-gtools
The package will install the /etc/synnefo/20-snf-cyclades-gtools-backend.conf configuration file. At least we need to set the RabbitMQ endpoint for all tools that need it:
AMQP_HOSTS=["amqp://synnefo:example_rabbitmq_passw0rd@node1.example.com:5672"]
The above variables should reflect your Message Queue setup. This file should be editted in all Ganeti nodes.
Connect snf-image with snf-progress-monitor
Finally, we need to configure snf-image to publish progress messages during the deployment of each Image. To do this, we edit /etc/default/snf-image and set the corresponding variable to snf-progress-monitor:
PROGRESS_MONITOR="snf-progress-monitor"
This file should be editted in all Ganeti nodes.
Synnefo RAPI user
As a last step before installing Cyclades, create a new RAPI user that will have write access. Cyclades will use this user to issue commands to Ganeti, so we will call the user cyclades with password example_rapi_passw0rd. You can do this, by first running:
# echo -n 'cyclades:Ganeti Remote API:example_rapi_passw0rd' | openssl md5
and then putting the output in /var/lib/ganeti/rapi/users as follows:
cyclades {HA1}55aec7050aa4e4b111ca43cb505a61a0 write
More about Ganeti’s RAPI users here.
You have now finished with all needed Prerequisites for Cyclades. Let’s move on to the actual Cyclades installation.
Installation of Cyclades on node1
This section describes the installation of Cyclades. Cyclades is Synnefo’s Compute service. The Image Service will get installed automatically along with Cyclades, because it is contained in the same Synnefo component.
We will install Cyclades on node1. To do so, we install the corresponding package by running on node1:
# apt-get install snf-cyclades-app memcached python-memcache snf-pithos-backend snf-vncauthproxy
If all packages install successfully, then Cyclades are installed and we proceed with their configuration.
Since version 0.13, Synnefo uses the VMAPI in order to prevent sensitive data needed by ‘snf-image’ to be stored in Ganeti configuration (e.g. VM password). This is achieved by storing all sensitive information to a CACHE backend and exporting it via VMAPI. The cache entries are invalidated after the first request. Synnefo uses memcached as a Django cache backend.
Configuration of Cyclades
Conf files
After installing Cyclades, a number of new configuration files will appear under /etc/synnefo/ prefixed with 20-snf-cyclades-app-. We will describe here only the minimal needed changes to result with a working system. In general, sane defaults have been chosen for the most of the options, to cover most of the common scenarios. However, if you want to tweak Cyclades feel free to do so, once you get familiar with the different options.
Edit /etc/synnefo/20-snf-cyclades-app-api.conf:
CYCLADES_BASE_URL = 'https://node1.example.com/cyclades'
ASTAKOS_AUTH_URL = 'https://node1.example.com/astakos/identity/v2.0'

CYCLADES_SERVICE_TOKEN = 'cyclades_service_token22w'
The ASTAKOS_AUTH_URL denotes the Astakos endpoint for Cyclades, which is used for all user management, including authentication. Since our Astakos, Cyclades, and Pithos installations belong together, they should all have identical ASTAKOS_AUTH_URL setting (see also, previously).
The CYCLADES_BASE_URL setting must point to the top-level Cyclades URL. Appending an extra path (/cyclades here) is recommended in order to distinguish components, if more than one are installed on the same machine.
The CYCLADES_SERVICE_TOKEN is the token used for authentication with Astakos. It can be retrieved by running on the Astakos node (node1 in our case):
# snf-manage component-list
The token has been generated automatically during the Cyclades service registration.
Edit /etc/synnefo/20-snf-cyclades-app-cloudbar.conf:
CLOUDBAR_LOCATION = 'https://node1.example.com/static/im/cloudbar/'
CLOUDBAR_SERVICES_URL = 'https://node1.example.com/astakos/ui/get_services'
CLOUDBAR_MENU_URL = 'https://node1.example.com/astakos/ui/get_menu'
CLOUDBAR_LOCATION tells the client where to find the Astakos common cloudbar. The CLOUDBAR_SERVICES_URL and CLOUDBAR_MENU_URL options are used by the Cyclades Web UI to get from Astakos all the information needed to fill its own cloudbar. So, we put our Astakos deployment urls there. All the above should have the same values we put in the corresponding variables in /etc/synnefo/20-snf-pithos-webclient-cloudbar.conf on the previous Pithos configuration section.
Edit /etc/synnefo/20-snf-cyclades-app-plankton.conf:
BACKEND_DB_CONNECTION = 'postgresql://synnefo:example_passw0rd@node1.example.com:5432/snf_pithos'
In this file we configure the Image Service. BACKEND_DB_CONNECTION denotes the Pithos database (where the Image files are stored). So we set that to point to our Pithos database.
Edit /etc/synnefo/20-snf-cyclades-app-queues.conf:
AMQP_HOSTS=["amqp://synnefo:example_rabbitmq_passw0rd@node1.example.com:5672"]
The above settings denote the Message Queue. Those settings should have the same values as in /etc/synnefo/20-snf-cyclades-gtools-backend.conf file, and reflect our Message Queue setup.
Edit /etc/synnefo/20-snf-cyclades-app-vmapi.conf:
VMAPI_CACHE_BACKEND = "memcached://127.0.0.1:11211/?timeout=3600"
Add a vncauthproxy user:
# vncauthproxy-passwd /var/lib/vncauthproxy/users synnefo
# /etc/init.d/vncauthproxy restart
Configure the vncauthproxy settings in /etc/synnefo/20-snf-cyclades-app-api.conf:
CYCLADES_VNCAUTHPROXY_OPTS = [{
    'auth_user': 'synnefo',
    'auth_password': 'secret_password',
    'server_address': '127.0.0.1',
    'server_port': 24999,
    'enable_ssl': False,
    'ca_cert': None,
    'strict': False,
}]
Depending on your snf-vncauthproxy setup, you might want to tweak the above settings. Check the documentation of snf-vncauthproxy for more information.
You should also provide snf-vncauthproxy with SSL certificates signed by a trusted CA. You can either copy them to /var/lib/vncauthproxy/{cert,key}.pem or inform vncauthproxy about the location of the certificates (via the DAEMON_OPTS setting in /etc/default/vncauthproxy).
DAEMON_OPTS="--pid-file=$PIDFILE --cert-file=<path_to_cert> --key-file=<path_to_key>"
Both files should be readable by the vncauthproxy user or group.
Note
When installing snf-vncauthproxy on the same node as Cyclades and using the default settings for snf-vncauthproxy, the certificates should be issued to the FQDN of the Cyclades worker. Refer to the admin guide, for more information on how to setup vncauthproxy on a different host / interface.
We have now finished with the basic Cyclades configuration.
Gunicorn configuration
Cyclades uses Pithos backend library to access and store system and user-provided images and snapshots.
We need to adjust gunicorn configuration in order to integrate with Archipelago. Set the --config=/etc/synnefo/gunicorn-hooks/gunicorn-archipelago.py option in the gunicorn configuration file located at /etc/gunicorn.d/synnefo.
Database Initialization
Once Cyclades is configured, we sync the database:
$ snf-manage syncdb
$ snf-manage migrate
and load the initial server flavors:
$ snf-manage loaddata flavors
If everything returns successfully, our database is ready.
Add the Ganeti backend
In our installation we assume that we only have one Ganeti cluster, the one we setup earlier. At this point you have to add this backend (Ganeti cluster) to Cyclades assuming that you have setup the Rapi User correctly.
$ snf-manage backend-add --clustername=ganeti.node1.example.com --user=cyclades --pass=example_rapi_passw0rd
You can see everything has been setup correctly by running:
$ snf-manage backend-list
Enable the new backend by running:
$ snf-manage backend-modify --drained False 1
Warning
Since version 0.13, the backend is set to “drained” by default. This means that you cannot add VMs to it. The reason for this is that the nodes should be unavailable to Synnefo until the Administrator explicitly releases them. To change this setting, use snf-manage backend-modify --drained False <backend-id>.
If something is not set correctly, you can modify the backend with the snf-manage backend-modify command. If something has gone wrong, you could modify the backend to reflect the Ganeti installation by running:
$ snf-manage backend-modify --clustername "ganeti.node1.example.com"
                            --user=cyclades
                            --pass=example_rapi_passw0rd
                            1
clustername denotes the Ganeti-cluster’s name. We provide the corresponding domain that resolves to the master IP, than the IP itself, to ensure Cyclades can talk to Ganeti even after a Ganeti master-failover.
user and pass denote the RAPI user’s username and the RAPI user’s password. Once we setup the first backend to point at our Ganeti cluster, we update the Cyclades backends status by running:
$ snf-manage backend-update-status
Cyclades can manage multiple Ganeti backends, but for the purpose of this guide,we won’t get into more detail regarding mulitple backends. If you want to learn more please see /TODO/.
Add a Public Network
After connecting Cyclades with our Ganeti cluster, we need to setup a Public Network. The basic setup is to bridge every created NIC on a bridge.
$ snf-manage network-create --subnet=10.0.0.0/24 \
                            --gateway=10.0.0.1 \
                            --public --dhcp=True --flavor=CUSTOM \
                            --link=br1 --mode=bridged \
                            --name=public_network \
                            --floating-ip-pool=True
This will create the Public Network on both Cyclades and the Ganeti backend. To make sure everything was setup correctly, also run:
# snf-manage reconcile-networks
You can use snf-manage reconcile-networks --fix-all to fix any inconsistencies that may have arisen.
You can see all available networks by running:
# snf-manage network-list
and inspect each network’s state by running:
# snf-manage network-inspect <net_id>
Finally, you can see the networks from the Ganeti perspective by running on the Ganeti MASTER:
# gnt-network list
# gnt-network info <network_name>
Create pools for Private Networks
To prevent duplicate assignment of resources to different private networks, Cyclades supports two types of pools:
- MAC prefix Pool
- Bridge Pool
As long as those resourses have been provisioned, admin has to define two these pools in Synnefo:
# snf-manage pool-create --type=mac-prefix --base=aa:00:0 --size=65536
Also, change the Synnefo setting in /etc/synnefo/20-snf-cyclades-app-api.conf:
DEFAULT_MAC_FILTERED_BRIDGE = 'br2'
Servers restart
Restart gunicorn on node1:
# /etc/init.d/gunicorn restart
Now let’s do the final connections of Cyclades with Ganeti.
snf-dispatcher initialization
snf-dispatcher dispatches all messages published to the Message Queue and manages the Cyclades database accordingly. It also initializes all exchanges. By default it is not enabled during installation of Cyclades, so let’s enable it in its configuration file /etc/default/snf-dispatcher:
SNF_DSPTCH_ENABLE=true
and start the daemon:
# /etc/init.d/snf-dispatcher start
You can see that everything works correctly by tailing its log file /var/log/synnefo/dispatcher.log.
snf-ganeti-eventd on GANETI MASTER
The last step of the Cyclades setup is enabling the snf-ganeti-eventd daemon (part of the Cyclades Ganeti tools package). The daemon is already installed on the GANETI MASTER (node1 in our case). snf-ganeti-eventd is disabled by default during the snf-cyclades-gtools installation, so we enable it in its configuration file /etc/default/snf-ganeti-eventd:
SNF_EVENTD_ENABLE=true
and start the daemon:
# /etc/init.d/snf-ganeti-eventd start
Warning
Make sure you start snf-ganeti-eventd ONLY on GANETI MASTER
Apply Quota
The following commands will check and fix the integrity of user quota. In a freshly installed system, these commands have no effect and can be skipped.
node1 # snf-manage quota-verify --fix
node1 # snf-manage reconcile-resources-astakos --fix
node2 # snf-manage reconcile-resources-pithos --fix
node1 # snf-manage reconcile-resources-cyclades --fix
VM stats configuration
Please refer to the documentation in the admin guide for deploying and configuring snf-stats-app and collectd.
If all the above return successfully, then you have finished with the Cyclades installation and setup.
Let’s test our installation now.
Testing of Cyclades
Cyclades Web UI
First of all we need to test that our Cyclades Web UI works correctly. Open your browser and go to the Astakos home page. Login and then click ‘Cyclades’ on the top cloud bar. This should redirect you to:
http://node1.example.com/cyclades/ui/
and the Cyclades home page should appear. If not, please go back and find what went wrong. Do not proceed if you don’t see the Cyclades home page.
If the Cyclades home page appears, click on the orange button ‘New machine’. The first step of the ‘New machine wizard’ will appear. This step shows all the available Images from which you can spawn new VMs. The list should be currently empty, as we haven’t registered any Images yet. Close the wizard and browse the interface (not many things to see yet). If everything seems to work, let’s register our first Image file.
Cyclades Images
To test our Cyclades installation, we will use an Image stored on Pithos to spawn a new VM from the Cyclades interface. We will describe all steps, even though you may already have uploaded an Image on Pithos from a previous section:
- Upload an Image file to Pithos
- Register that Image file to Cyclades
- Spawn a new VM from that Image from the Cyclades Web UI
We will use the kamaki command line client to do the uploading and registering of the Image.
Installation of Kamaki
You can install Kamaki anywhere you like, since it is a standalone client of the APIs and talks to the installation over https. For the purpose of this guide we will assume that we have downloaded the Debian Wheezy Base Image and stored it under node1’s /srv/images directory. For that reason we will install Kamaki on node1, too. We do this by running:
# apt-get install kamaki
Configuration of Kamaki
Now we need to setup Kamaki, by adding the appropriate URLs and tokens of our installation. We do this by running:
$ kamaki config set cloud.default.url \
    "https://node1.example.com/astakos/identity/v2.0"
$ kamaki config set cloud.default.token USER_TOKEN
Both the Authentication URL and the USER_TOKEN appear on the user’s API access web page on the Astakos Web UI.
You can see that the new configuration options have been applied correctly, either by checking the editable file ~/.kamakirc or by running:
$ kamaki config list
A quick test to check that Kamaki is configured correctly, is to try to authenticate a user based on his/her token (in this case the user is you):
$ kamaki user authenticate
The above operation provides various user information, e.g. UUID (the unique user id) which might prove useful in some operations.
Upload an Image file to Pithos
Now, that we have set up Kamaki we will upload the Image that we have downloaded and stored under /srv/images/. Although we can upload the Image under the root Pithos container (as you may have done when uploading the Image from the Pithos Web UI), we will create a new container called images and store the Image under that container. We do this for two reasons:
- To demonstrate how to create containers other than the default Pithos. This can be done only with the Kamaki client and not through the Web UI.
- As a best organization practise, so that you won’t have your Image files tangled along with all your other Pithos files and directory structures.
We create the new images container by running:
$ kamaki container create images
To check if the container has been created, list all containers of your account:
$ kamaki file list /images
Then, we upload the Image file to that container:
$ kamaki file upload /srv/images/debian_base-7.0-x86_64.diskdump images
The first is the local path and the second is the remote container on Pithos. Check if the file has been uploaded, by listing the container contents:
$ kamaki file list /images
Alternatively check if the new container and file appear on the Pithos Web UI.
Register an existing Image file to Cyclades
For the purposes of the following example, we assume that the user has uploaded a file in container pithos called debian_base-7.0-x86_64.diskdump. Moreover, he should have the appropriate metadata file.
$ wget https://cdn.synnefo.org/debian_base-7.0-x86_64.diskdump.meta
Once the Image file has been successfully uploaded on Pithos then we register it to Cyclades, by running:
$ kamaki image register --name "Debian Base" \
                        --location /images/debian_base-7.0-x86_64.diskdump \
                        --public \
                        --metafile debian_base-7.0-x86_64.diskdump.meta
This command registers a Pithos file as an Image in Cyclades. This Image will be public (--public), so all users will be able to spawn VMs from it.
Spawn a VM from the Cyclades Web UI
If the registration completes successfully, then go to the Cyclades Web UI from your browser at:
https://node1.example.com/cyclades/ui/
Click on the ‘New Machine’ button and the first step of the wizard will appear. Click on ‘My Images’ (right after ‘System’ Images) on the left pane of the wizard. Your previously registered Image “Debian Base” should appear under ‘Available Images’. If not, something has gone wrong with the registration. Make sure you can see your Image file on the Pithos Web UI and kamaki image register returns successfully with all options and properties as shown above.
If the Image appears on the list, select it and complete the wizard by selecting a flavor and a name for your VM. Then finish by clicking ‘Create’. Make sure you write down your password, because you WON’T be able to retrieve it later.
If everything was setup correctly, after a few minutes your new machine will go to state ‘Running’ and you will be able to use it. Click ‘Console’ to connect through VNC out of band, or click on the machine’s icon to connect directly via SSH or RDP (for windows machines).
Installation of Admin on node1
This section describes the installation of Admin. Admin is a Synnefo component that provides to trusted users the ability to manage and view various different Synnefo entities such as users, VMs, projects etc.
We will install Admin on node1. To do so, we install the corresponding package by running on node1 the following command:
# apt-get install snf-admin-app
Once the package is installed, we must configure the ADMIN_BASE_URL setting. This setting is located in the 20-snf-admin-app-general.conf settings file. Uncomment it and assign the following URL to it:
https://node1.example.com/admin
Restart gunicorn on node1:
# /etc/init.d/gunicorn restart
Now, we can proceed with testing Admin.
Testing of Admin
In order to test the Admin Dashboard, we need a user that belongs to the admin group. We will use the user that was created in Testing of Astakos section:
root@node1:~ # snf-manage group-add admin
root@node1:~ # snf-manage user-modify 1 --add-group=admin
Then, you need to login to the Astakos node by visiting the following URL:
https://node1.example.com/astakos
Once you login successfully, you can access the Admin Dashboard from this URL:
https://node1.example.com/admin
This should redirect you to the Users table, where there should be an entry with this user.
Congratulations. You have successfully installed the whole Synnefo stack and connected all components.