Synnefo Administrator’s Guide
This is the complete Synnefo Administrator’s Guide.
General Synnefo Architecture
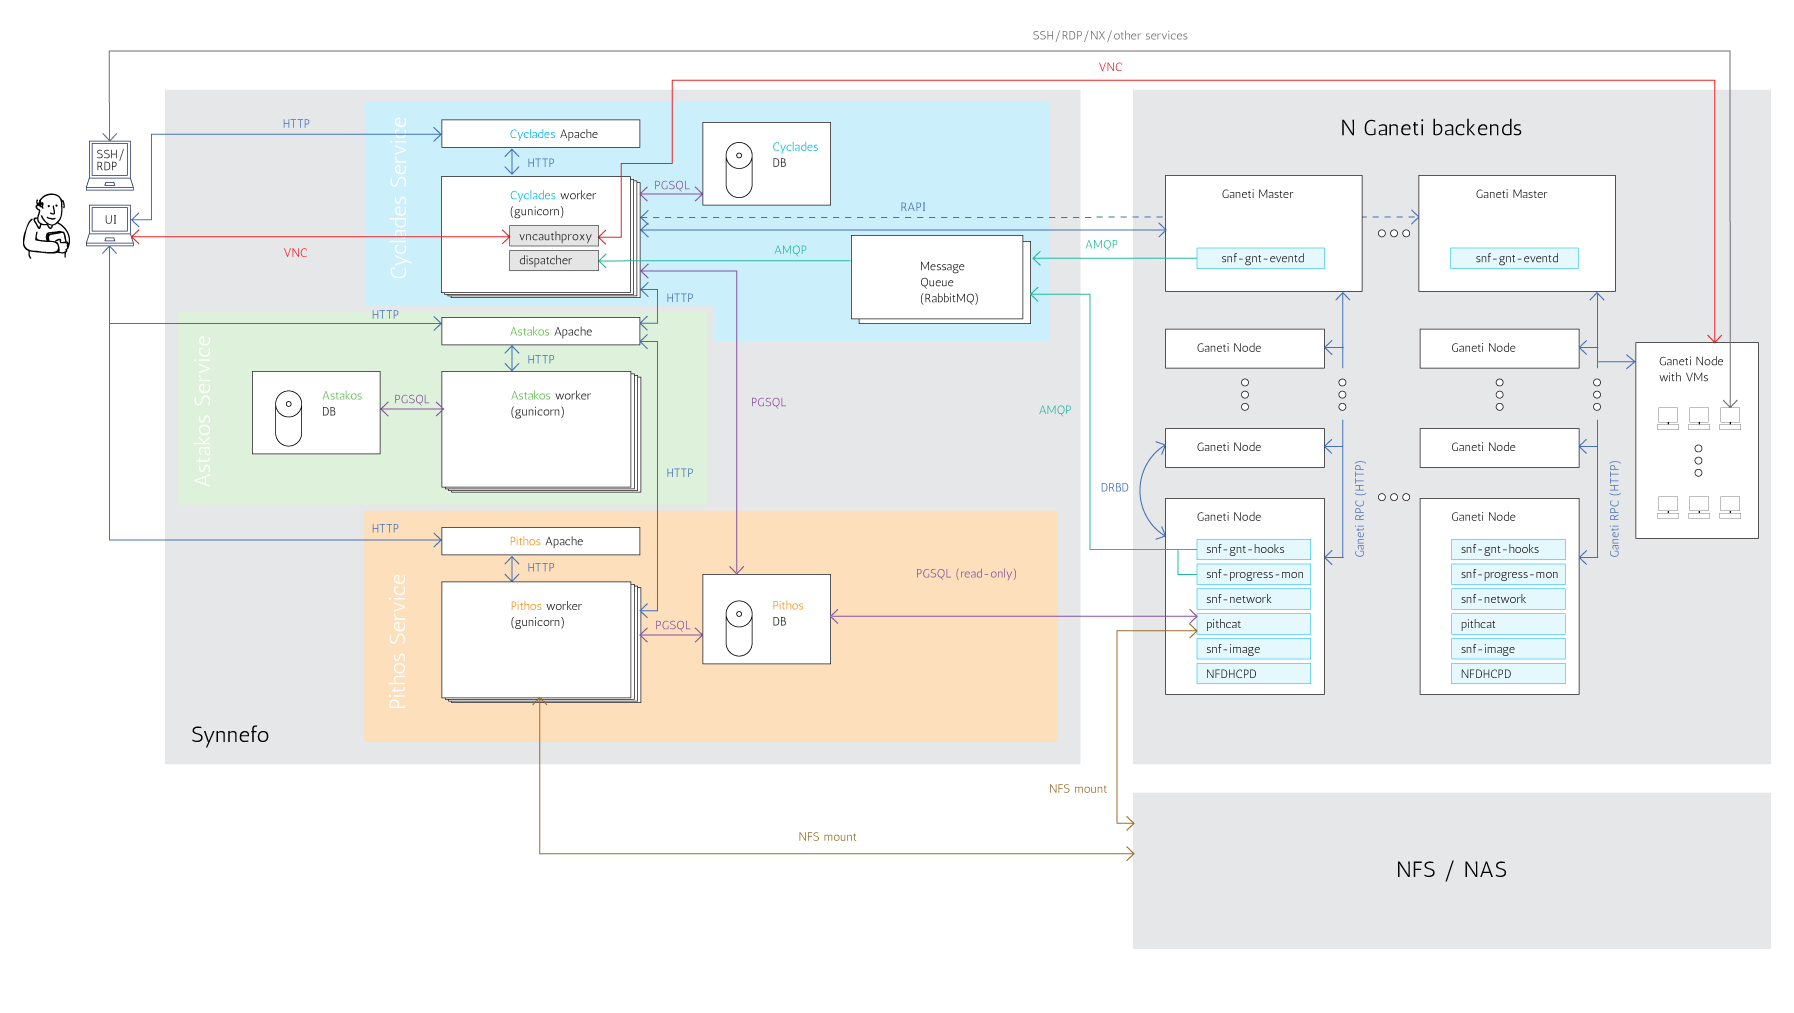
The following graph shows the whole Synnefo architecture and how it interacts with multiple Ganeti clusters. We hope that after reading the Administrator’s Guide you will be able to understand every component and all the interactions between them. It is a good idea to first go through the Administrator’s Guide before proceeding.
Identity Service (Astakos)
Overview
Authentication methods
Local Authentication
LDAP Authentication
Shibboleth Authentication
Astakos can delegate user authentication to a Shibboleth federation.
To setup shibboleth, install package:
apt-get install libapache2-mod-shib2
Change appropriately the configuration files in /etc/shibboleth.
Add in /etc/apache2/sites-available/synnefo-ssl:
ShibConfig /etc/shibboleth/shibboleth2.xml
Alias      /shibboleth-sp /usr/share/shibboleth

<Location /ui/login/shibboleth>
  AuthType shibboleth
  ShibRequireSession On
  ShibUseHeaders On
  require valid-user
</Location>
and before the line containing:
ProxyPass / http://localhost:8080/ retry=0
add:
ProxyPass /Shibboleth.sso !
Then, enable the shibboleth module:
a2enmod shib2
After passing through the apache module, the following tokens should be available at the destination:
eppn # eduPersonPrincipalName
Shib-InetOrgPerson-givenName
Shib-Person-surname
Shib-Person-commonName
Shib-InetOrgPerson-displayName
Shib-EP-Affiliation
Shib-Session-ID
Finally, add ‘shibboleth’ in ASTAKOS_IM_MODULES list. The variable resides inside the file /etc/synnefo/20-snf-astakos-app-settings.conf
Twitter Authentication
To enable twitter authentication while signed in under a Twitter account, visit dev.twitter.com/apps.
Click Create an application.
Fill the necessary information and for callback URL give:
https://node1.example.com/ui/login/twitter/authenticated
Finally, add ‘twitter’ in ASTAKOS_IM_MODULES list. The variable resides inside the file /etc/synnefo/20-snf-astakos-app-settings.conf
Google Authentication
To enable google authentication while signed in under a Google account, visit https://code.google.com/apis/console/.
Under API Access select Create another client ID, select Web application, expand more options in Your site or hostname section and in Authorized Redirect URIs add:
Fill the necessary information and for callback URL give:
https://node1.example.com/ui/login/google/authenticated
Finally, add ‘google’ in ASTAKOS_IM_MODULES list. The variable resides inside the file /etc/synnefo/20-snf-astakos-app-settings.conf
Architecture
Prereqs
Installation
Configuration
Working with Astakos
User registration
When a new user signs up, he/she is not directly marked as active. You can see his/her state by running (on the machine that runs the Astakos app):
$ snf-manage user-list
More detailed user status is provided in the status field of the user-show command:
$ snf-manage user-show <user-id>

id                  : 6
uuid                : 78661411-5eed-412f-a9ea-2de24f542c2e
status              : Accepted/Active (accepted policy: manual)
email               : user@synnefo.org
....
Based on how your configuration of astakos-app, there are several ways for a user to get activated and be able to login. We discuss the user activation flow in the following section.
User activation flow
A user can register for an account using the astakos signup form. Once the form is submited successfully a user entry is created in astakos database. That entry is passed through the astakos activation backend which handles whether the user should be automatically verified and activated.
Email verification
The verification process takes place in order to ensure that the user owns the email provided during the signup process. By default, after each successful signup astakos notifies user with an verification url via email.
At this stage:
- subsequent registrations invalidate and delete the previous registrations of the same email address.
- in case user misses the initial notification, additional emails can be send either via the url which is prompted to the user if he tries to login, or by the administrator using the snf-manage user-activation-send <userid> command.
- administrator may also enforce a user to get verified using the snf-manage user-modify --verify <userid> command.
Account activation
Once user gets verified it is time for astakos to decide whether or not to proceed through user activation process. If ASTAKOS_MODERATION_ENABLED setting is set to False (default value) user gets activated automatically.
In case the moderation is enabled astakos may still automatically activate the user in the following cases:
- User email matches any of the regular expressions defined in ASTAKOS_RE_USER_EMAIL_PATTERNS (defaults to [])
- User used a signup method (e.g. shibboleth) for which automatic activation is enabled (see authentication methods policies).
If all of the above fail to trigger automatic activation, an email is sent to the persons listed in HELPDESK, MANAGERS and ADMINS settings, notifing that there is a new user pending for moderation and that it’s up to the administrator to decide if the user should be activated, using the user-modify command.
# command to activate a pending user
$ snf-manage user-modify --accept <userid>

# command to reject a pending user
$ snf-manage user-modify --reject --reject-reason="spammer" <userid>
Once activation process finish, a greeting message is sent to the user email address and a notification for the activation to the persons listed in HELPDESK, MANAGERS and ADMINS settings. Once activated the user is able to login and access the synnefo services.
Additional authentication methods
Astakos supports third party logins from external identity providers. This can be usefull since it allows users to use their existing credentials to login to astakos service.
Currently astakos supports the following identity providers:
- Shibboleth (module name shibboleth)
- Google (module name google)
- Twitter (module name twitter)
- LinkedIn (module name linkedin)
To enable any of the above modules (by default only local accounts are allowed), retrieve and set the required provider settings and append the module name in ASTAKOS_IM_MODULES.
# settings from https://code.google.com/apis/console/
ASTAKOS_GOOGLE_CLIENT_ID = '1111111111-epi60tvimgha63qqnjo40cljkojcann3.apps.googleusercontent.com'
ASTAKOS_GOOGLE_SECRET = 'tNDQqTDKlTf7_LaeUcWTWwZM'

# let users signup and login using their google account
ASTAKOS_IM_MODULES = ['local', 'google']
Authentication method policies
Astakos allows you to override the default policies for each enabled provider separately by adding the approriate settings in your .conf files in the following format:
ASTAKOS_AUTH_PROVIDER_<module>_<policy>_POLICY
Available policies are:
- CREATE Users can signup using that provider (default: True)
- REMOVE/ADD Users can remove/add login method from their profile (default: True)
- AUTOMODERATE Automatically activate users that signup using that provider (default: False)
- LOGIN Whether or not users can use the provider to login (default: True).
e.g. to enable automatic activation for your academic users, while keeping locally signed up users under moderation you can apply the following settings.
ASTAKOS_AUTH_PROVIDER_SHIBBOLETH_AUTOMODERATE_POLICY = True
ASTAKOS_AUTH_PROVIDER_SHIBBOLETH_REMOVE_POLICY = False
Setting quota limits
Set default quota
In 20-snf-astakos-app-settings.conf, uncomment the default setting ASTAKOS_SERVICES and customize the 'uplimit' values. These are the default base quota for all users.
To apply your configuration run:
# snf-manage astakos-init --load-service-resources
# snf-manage quota --sync
Set base quota for individual users
For individual users that need different quota than the default you can set it for each resource like this:
# use this to display quota / uuid
# snf-manage user-show 'uuid or email' --quota

# snf-manage user-modify 'user-uuid' --set-base-quota 'cyclades.vm' 10
Enable the Projects feature
If you want to enable the projects feature so that users may apply on their own for resources by creating and joining projects, in 20-snf-astakos-app-settings.conf set:
# this will make the 'projects' page visible in the dashboard
ASTAKOS_PROJECTS_VISIBLE = True
You can change the maximum allowed number of pending project applications per user with:
# snf-manage resource-modify astakos.pending_app --limit <number>
You can also set a user-specific limit with:
# snf-manage user-modify 'user-uuid' --set-base-quota 'astakos.pending_app' 5
When users apply for projects they are not automatically granted the resources. They must first be approved by the administrator.
To list pending project applications in astakos:
# snf-manage project-list --pending
Note the last column, the application id. To approve it:
# <app id> from the last column of project-list
# snf-manage project-control --approve <app id>
To deny an application:
# snf-manage project-control --deny <app id>
Users designated as project admins can approve, deny, or modify an application through the web interface. In 20-snf-astakos-app-settings.conf set:
# UUIDs of users that can approve or deny project applications from the web.
ASTAKOS_PROJECT_ADMINS = [<uuid>, ...]
Astakos advanced operations
Adding “Terms of Use”
Astakos supports versioned terms-of-use. First of all you need to create an html file that will contain your terms. For example, create the file /usr/share/synnefo/sample-terms.html, which contains the following:
<h1>~okeanos terms</h1>

These are the example terms for ~okeanos
Then, add those terms-of-use with the snf-manage command:
$ snf-manage term-add /usr/share/synnefo/sample-terms.html
Your terms have been successfully added and you will see the corresponding link appearing in the Astakos web pages’ footer.
Enabling reCAPTCHA
Astakos supports the reCAPTCHA feature. If enabled, it protects the Astakos forms from bots. To enable the feature, go to https://www.google.com/recaptcha/admin/create and create your own reCAPTCHA key pair. Then edit /etc/synnefo/20-snf-astakos-app-settings.conf and set the corresponding variables to reflect your newly created key pair. Finally, set the ASTAKOS_RECAPTCHA_ENABLED variable to True:
ASTAKOS_RECAPTCHA_PUBLIC_KEY = 'example_recaptcha_public_key!@#$%^&*('
ASTAKOS_RECAPTCHA_PRIVATE_KEY = 'example_recaptcha_private_key!@#$%^&*('

ASTAKOS_RECAPTCHA_ENABLED = True
Restart the service on the Astakos node(s) and you are ready:
# /etc/init.d/gunicorn restart
Checkout your new Sign up page. If you see the reCAPTCHA box, you have setup everything correctly.
File Storage Service (Pithos)
Overview
Architecture
Prereqs
Installation
Configuration
Working with Pithos
Pithos advanced operations
Compute/Network/Image Service (Cyclades)
Compute Overview
Network Overview
Image Overview
Architecture
Asynchronous communication with Ganeti backends
Synnefo uses Google Ganeti backends for VM cluster management. In order for Cyclades to be able to handle thousands of user requests, Cyclades and Ganeti communicate asynchronously. Briefly, requests are submitted to Ganeti through Ganeti’s RAPI/HTTP interface, and then asynchronous notifications about the progress of Ganeti jobs are being created and pushed upwards to Cyclades. The architecture and communication with a Ganeti backend is shown in the graph below:

The Cyclades API server is responsible for handling user requests. Read-only requests are directly served by looking up the Cyclades DB. If the request needs an action in the Ganeti backend, Cyclades submit jobs to the Ganeti master using the Ganeti RAPI interface.
While Ganeti executes the job, snf-ganeti-eventd, snf-ganeti-hook and snf-progress-monitor are monitoring the progress of the job and send corresponding messages to the RabbitMQ servers. These components are part of snf-cyclades-gtools and must be installed on all Ganeti nodes. Specially:
- snf-ganeti-eventd sends messages about operations affecting the operating state of instances and networks. Works by monitoring the Ganeti job queue.
- snf-ganeti_hook sends messages about the NICs of instances. It includes a number of Ganeti hooks for customisation of operations.
- snf-progress_monitor sends messages about the progress of the Image deployment phase which is done by the Ganeti OS Definition snf-image.
Finally, snf-dispatcher consumes messages from the RabbitMQ queues, processes these messages and properly updates the state of the Cyclades DB. Subsequent requests to the Cyclades API, will retrieve the updated state from the DB.
Prereqs
Work in progress. Please refer to administrator’s install quide.
Installation
Work in progress. Please refer to administrator’s install quide.
Configuration
Work in progress. Please refer to administrator’s install quide.
Working with Cyclades
Managing Ganeti Backends
Since v0.11, Synnefo is able to manage multiple Ganeti clusters (backends) making it capable to scale linearly to tens of thousands of VMs. Backends can be dynamically added or removed via snf-manage commands.
Each newly created VM is allocated to a Ganeti backend by the Cyclades backend allocator. The VM is “pinned” to this backend, and can not change through its lifetime. The backend allocator decides in which backend to spawn the VM based on the available resources of each backend, trying to balance the load between them.
Handling of Networks, as far as backends are concerned, is based on whether the network is public or not. Public networks are created through the snf-manage network-create command, and are only created on one backend. Private networks are created on all backends, in order to ensure that VMs residing on different backends can be connected to the same private network.
Listing existing backends
To list all the Ganeti backends known to Synnefo, we run:
$ snf-manage backend-list
Adding a new Ganeti backend
Backends are dynamically added under the control of Synnefo with snf-manage backend-add command. In this section it is assumed that a Ganeti cluster, named cluster.example.com is already up and running and configured to be able to host Synnefo VMs.
To add this Ganeti cluster, we run:
$ snf-manage backend-add --clustername=cluster.example.com --user="synnefo_user" --pass="synnefo_pass"
where clustername is the Cluster hostname of the Ganeti cluster, and user and pass are the credentials for the Ganeti RAPI user. All backend attributes can be also changed dynamically using the snf-manage backend-modify command.
snf-manage backend-add will also create all existing private networks to the new backend. You can verify that the backend is added, by running snf-manage backend-list.
Note that no VMs will be spawned to this backend, since by default it is in a drained state after addition and also it has no public network assigned to it.
So, first you need to create its public network, make sure everything works as expected and finally make it active by un-setting the drained flag. You can do this by running:
$ snf-manage backend-modify --drained=False <backend_id>
Removing an existing Ganeti backend
In order to remove an existing backend from Synnefo, we run:
# snf-manage backend-remove <backend_id>
This command will fail if there are active VMs on the backend. Also, the backend is not cleaned before removal, so all the Synnefo private networks will be left on the Ganeti nodes. You need to remove them manually.
Allocation of VMs in Ganeti backends
As already mentioned, the Cyclades backend allocator is responsible for allocating new VMs to backends. This allocator does not choose the exact Ganeti node that will host the VM but just the Ganeti backend. The exact node is chosen by the Ganeti cluster’s allocator (hail).
The decision about which backend will host a VM is based on the available resources. The allocator computes a score for each backend, that shows its load factor, and the one with the minimum score is chosen. The admin can exclude backends from the allocation phase by marking them as drained by running:
$ snf-manage backend-modify --drained=True <backend_id>
The backend resources are periodically updated, at a period defined by the BACKEND_REFRESH_MIN setting, or by running snf-manage backend-update-status command. It is advised to have a cron job running this command at a smaller interval than BACKEND_REFRESH_MIN in order to remove the load of refreshing the backends stats from the VM creation phase.
Finally, the admin can decide to have a user’s VMs being allocated to a specific backend, with the BACKEND_PER_USER setting. This is a mapping between users and backends. If the user is found in BACKEND_PER_USER, then Synnefo allocates all his/hers VMs to the specific backend in the variable, even if is marked as drained (useful for testing).
Managing Virtual Machines
As mentioned, Cyclades uses Ganeti for management of VMs. The administrator can handle Cyclades VMs just like any other Ganeti instance, via gnt-instance commands. All Ganeti instances that belong to Synnefo, are separated from others, by a prefix in their names. This prefix is defined in BACKEND_PREFIX_ID setting in /etc/synnefo/20-snf-cyclades-app-backend.conf.
Apart from handling instances directly in the Ganeti level, a number of snf-manage commands are available:
- snf-manage server-list: List servers
- snf-manage server-show: Show information about a server in the Cyclades DB
- snf-manage server-inspect: Inspect the state of a server both in DB and Ganeti
- snf-manage server-modify: Modify the state of a server in the Cycldes DB
- snf-manage server-create: Create a new server
- snf-manage server-import: Import an existing Ganeti instance to Cyclades
Managing Virtual Networks
Cyclades is able to create and manage Virtual Networks. Networking is desployment specific and must be customized based on the specific needs of the system administrator. For better understanding of networking please refer to the Network section.
Exactly as Cyclades VMs can be handled like Ganeti instances, Cyclades Networks can also by handled as Ganeti networks, via gnt-network commands. All Ganeti networks that belong to Synnefo are named with the prefix ${BACKEND_PREFIX_ID}-net-.
There are also the following snf-manage commands for managing networks:
- snf-manage network-list: List networks
- snf-manage network-show: Show information about a network in the Cyclades DB
- snf-manage network-inspect: Inspect the state of the network in DB and Ganeti backends
- snf-manage network-modify: Modify the state of a network in the Cycldes DB
- snf-manage network-create: Create a new network
- snf-manage network-remove: Remove an existing network
Managing Network Resources
Proper operation of the Cyclades Network Service depends on the unique assignment of specific resources to each type of virtual network. Specifically, these resources are:
- IP addresses. Cyclades creates a Pool of IPs for each Network, and assigns a unique IP address to each VM, thus connecting it to this Network. You can see the IP pool of each network by running snf-manage network-inspect <network_ID>. IP pools are automatically created and managed by Cyclades, depending on the subnet of the Network.
- Bridges corresponding to physical VLANs, which are required for networks of type PRIVATE_PHYSICAL_VLAN.
- One Bridge corresponding to one physical VLAN which is required for networks of type PRIVATE_MAC_PREFIX.
Cyclades allocates those resources from pools that are created by the administrator with the snf-manage pool-create management command.
Pool Creation
Pools are created using the snf-manage pool-create command:
# snf-manage pool-create --type=bridge --base=prv --size=20
will create a pool of bridges, containing bridges prv1, prv2,..prv21.
You can verify the creation of the pool, and check its contents by running:
# snf-manage pool-list
# snf-manage pool-show --type=bridge 1
With the same commands you can handle a pool of MAC prefixes. For example:
# snf-manage pool-create --type=mac-prefix --base=aa:00:0 --size=65536
will create a pool of MAC prefixes from aa:00:1 to b9:ff:f. The MAC prefix pool is responsible for providing only unicast and locally administered MAC addresses, so many of these prefixes will be externally reserved, to exclude from allocation.
Cyclades advanced operations
Reconciliation mechanism
On certain occasions, such as a Ganeti or RabbitMQ failure, the state of Cyclades database may differ from the real state of VMs and networks in the Ganeti backends. The reconciliation process is designed to synchronize the state of the Cyclades DB with Ganeti. There are two management commands for reconciling VMs and Networks
Reconciling Virtual Machines
Reconciliation of VMs detects the following conditions:
- Stale DB servers without corresponding Ganeti instances
- Orphan Ganeti instances, without corresponding DB entries
- Out-of-sync state for DB entries wrt to Ganeti instances
To detect all inconsistencies you can just run:
$ snf-manage reconcile-servers
Adding the –fix-all option, will do the actual synchronization:
$ snf-manage reconcile-servers --fix-all
Please see snf-manage reconcile-servers --help for all the details.
Reconciling Networks
Reconciliation of Networks detects the following conditions:
- Stale DB networks without corresponding Ganeti networks
- Orphan Ganeti networks, without corresponding DB entries
- Private networks that are not created to all Ganeti backends
- Unsynchronized IP pools
To detect all inconsistencies you can just run:
$ snf-manage reconcile-networks
Adding the –fix-all option, will do the actual synchronization:
$ snf-manage reconcile-networks --fix-all
Please see snf-manage reconcile-networks --help for all the details.
Block Storage Service (Archipelago)
Overview
Archipelago offers Copy-On-Write snapshotable volumes. Pithos images can be used to provision a volume with Copy-On-Write semantics (i.e. a clone). Snapshots offer a unique deduplicated image of a volume, that reflects the volume state during snapshot creation and are indistinguishable from a Pithos image.
Archipelago is used by Cyclades and Ganeti for fast provisioning of VMs based on CoW volumes. Moreover, it enables live migration of thinly-provisioned VMs with no physically shared storage.
Archipelago Architecture
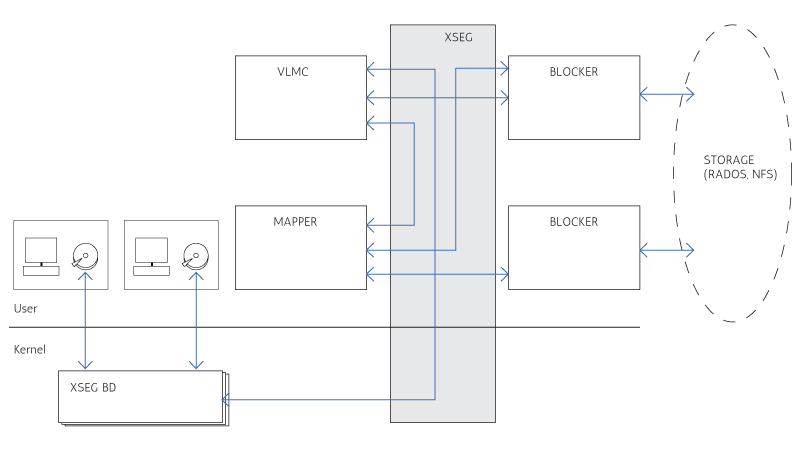
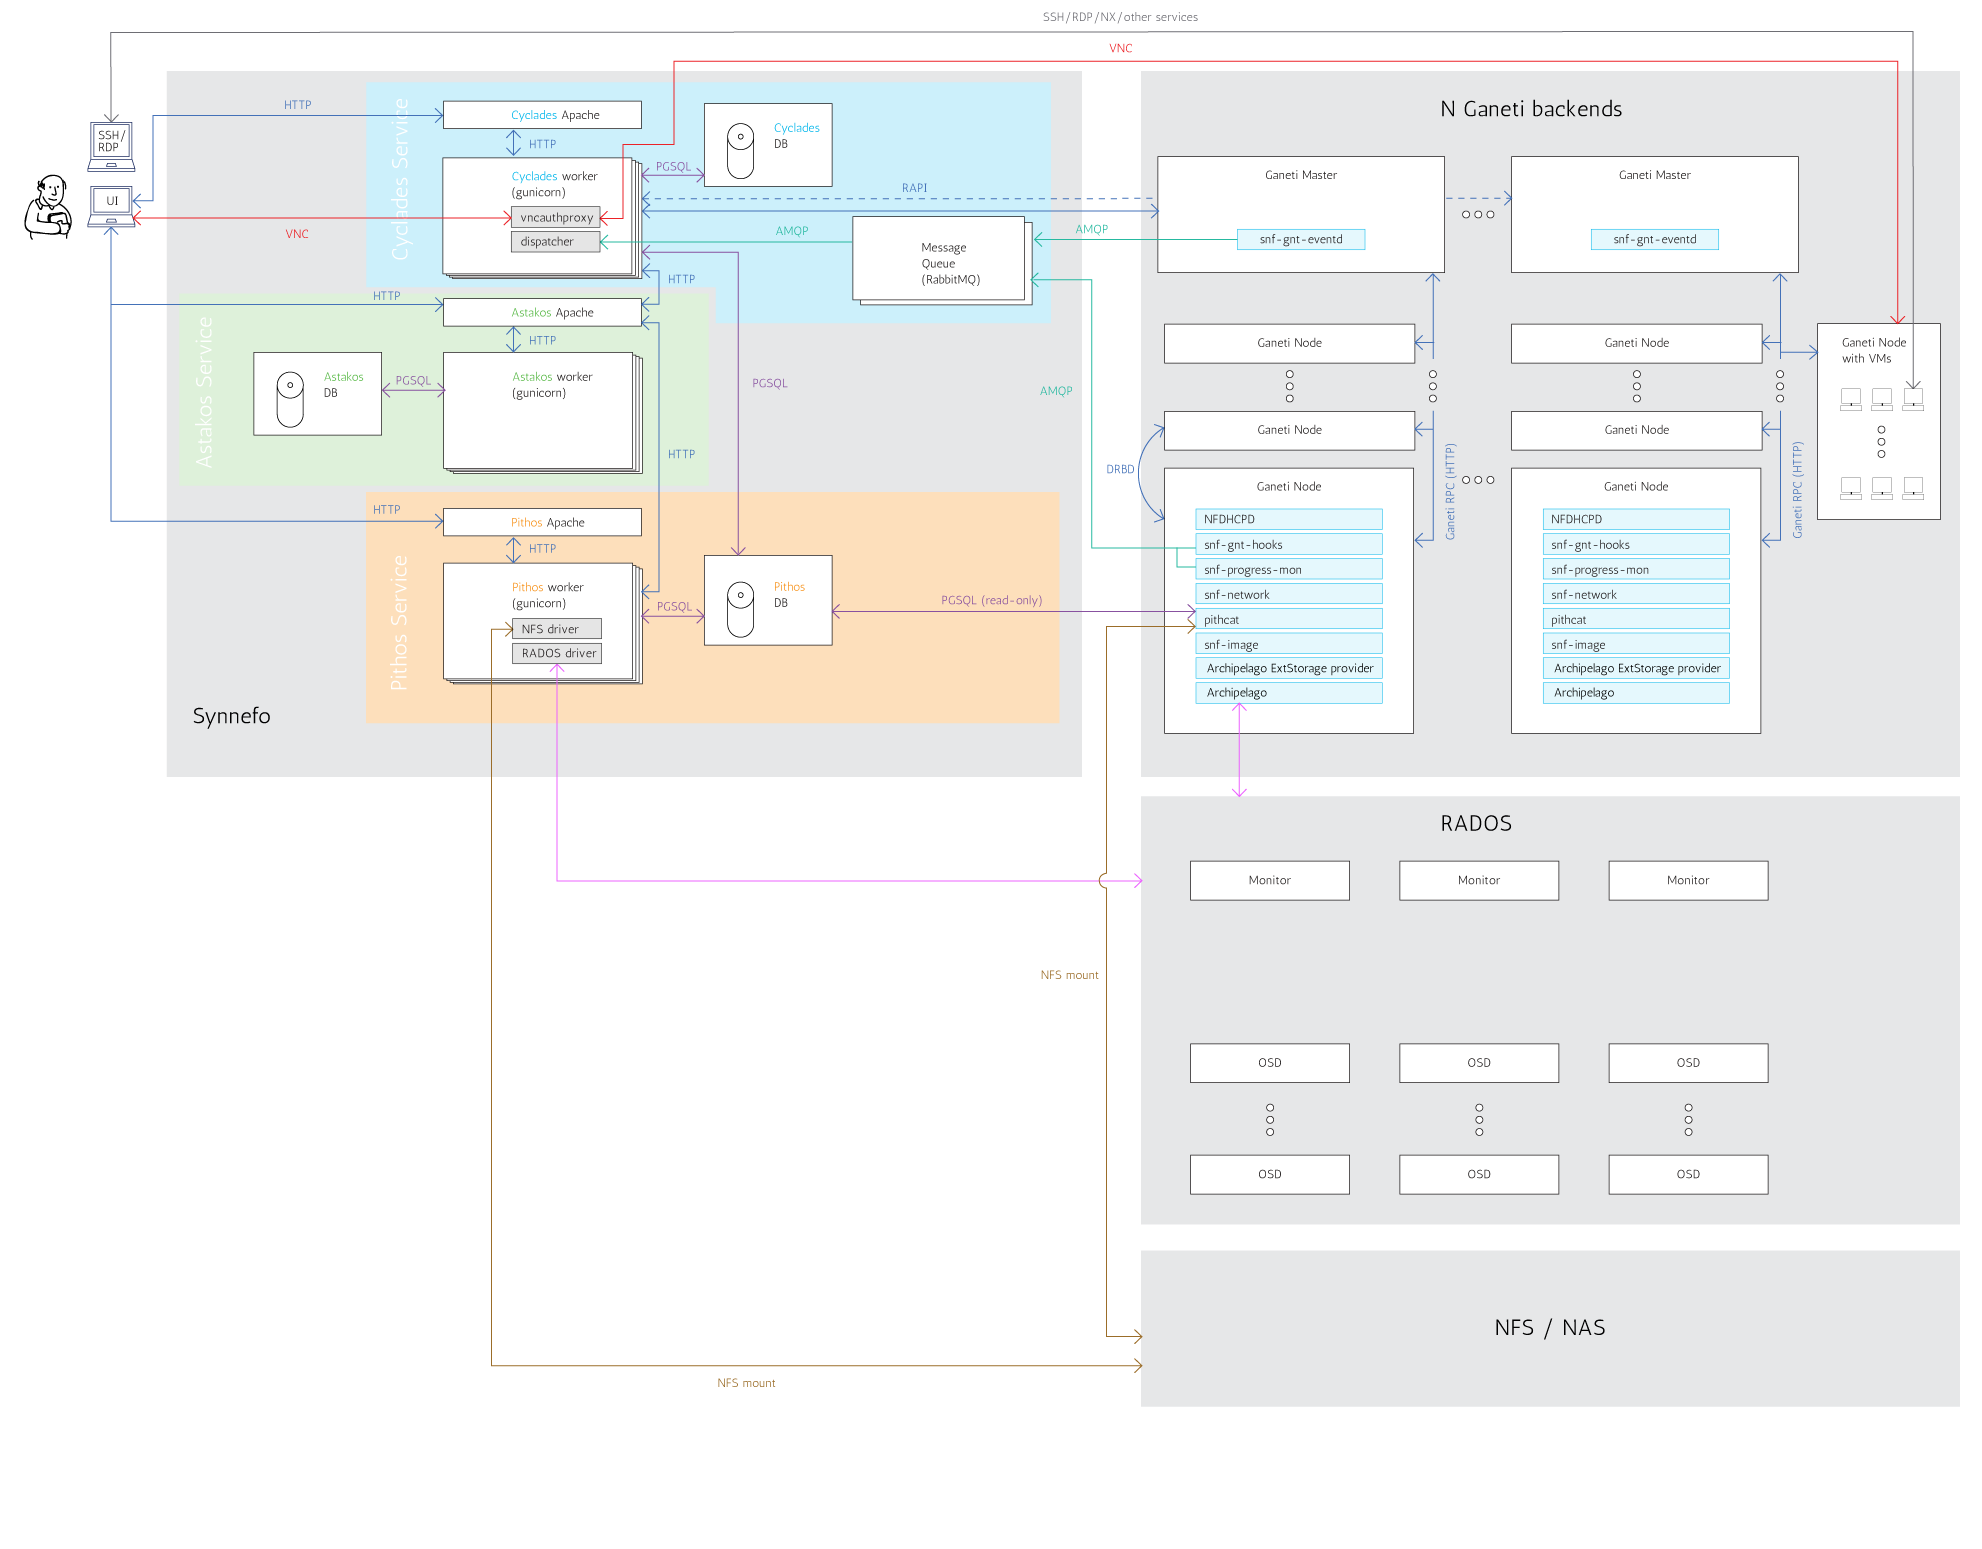
Overview of Synnefo + Archipelago + RADOS
Prereqs
The administrator must initialize the storage backend where archipelago volume blocks will reside.
In case of a files backend, the administrator must create two directories. One for the archipelago data blocks and one for the archipelago map blocks. These should probably be over shared storage to enable sharing archipelago volumes between multiple nodes. He or she, must also be able to supply a directory where the pithos data and map blocks reside.
In case of a RADOS backend, the administrator must create two rados pools, one for data blocks, and one for the map blocks. These pools, must be the same pools used in pithos, in order to enable volume creation based on pithos images.
Installation
Archipelago consists of
- libxseg0: libxseg used to communicate over shared memory segments
- python-xseg: python bindings for libxseg
- archipelago-kernel-dkms: contains archipelago kernel modules to provide block devices to be used as vm disks
- python-archipelago: archipelago python module. Includes archipelago and vlmc functionality.
- archipelago: user space tools and peers for the archipelago management and volume composition
- archipelago-ganeti: ganeti ext storage scripts, that enable ganeti to provision VMs over archipelago
Performing
$ apt-get install archipelago-ganeti
should fetch all the required packages and get you up ‘n going with archipelago
Bare in mind, that custom librados is required, which is provided in the apt repo of GRNet.
For now, librados is a dependency of archipelago, even if you do not intend to use archipelago over RADOS.
Configuration
Archipelago should work out of the box with a RADOS backend, but basic configuration can be done in /etc/default/archipelago .
If you wish to change the storage backend to files, set
STORAGE="files"
and provide the appropriate settings for files storage backend in the conf file.
These are:
- FILED_IMAGES: directory for archipelago data blocks.
- FILED_MAPS: directory for archipelago map blocks.
- PITHOS: directory of pithos data blocks.
- PITHOSMAPS: directory of pithos map blocks.
The settings for RADOS storage backend are:
- RADOS_POOL_MAPS: The pool where archipelago and pithos map blocks reside.
- RADOS_POOL_BLOCKS: The pool where archipelago and pithos data blocks reside.
Examples can be found in the conf file.
Be aware that archipelago infrastructure doesn’t provide default values for this settings. If they are not set in the conf file, archipelago will not be able to function.
Archipelago also provides VERBOSITY config options to control the output generated by the userspace peers.
The available options are:
- VERBOSITY_BLOCKERB
- VERBOSITY_BLOCKERM
- VERBOSITY_MAPPER
- VERBOSITY_VLMC
and the available values are:
- 0 : Error only logging.
- 1 : Warning logging.
- 2 : Info logging.
- 3 : Debug logging. WARNING: This options produces tons of output, but the logrotate daemon should take care of it.
Working with Archipelago
archipelago provides basic functionality for archipelago.
Usage:
$ archipelago [-u] command
Currently it supports the following commands:
- start [peer] Starts archipelago or the specified peer.
- stop [peer] Stops archipelago or the specified peer.
- restart [peer] Restarts archipelago or the specified peer.
- status Show the status of archipelago.
Available peers: blockerm, blockerb, mapperd, vlmcd.
start, stop, restart can be combined with the -u / --user option to affect only the userspace peers supporting archipelago.
Archipelago advanced operations
The vlmc tool provides a way to interact with archipelago volumes
vlmc map <volumename>: maps the volume to a xsegbd device.
vlmc unmap </dev/xsegbd[1-..]>: unmaps the specified device from the system.
vlmc create <volumename> --snap <snapname> --size <size>: creates a new volume named <volumename> from snapshot name <snapname> with size <size>. The --snap and --size are optional, but at least one of them is mandatory. e.g:
vlmc create <volumename> --snap <snapname> creates a volume named volumename from snapshot snapname. The size of the volume is the same as the size of the snapshot.
vlmc create <volumename> --size <size> creates an empty volume of size <size> named <volumename>.
vlmc remove <volumename>: removes the volume and all the related archipelago blocks from storage.
vlmc list: provides a list of archipelago volumes. Currently only works with RADOS storage backend.
vlmc info <volumename>: shows volume information. Currently returns only volume size.
vlmc open <volumename>: opens an archipelago volume. That is, taking all the necessary locks and also make the rest of the infrastructure aware of the operation.
This operation succeeds if the volume is alread opened.
vlmc close <volumename>: closes an archipelago volume. That is, performing all the necessary functions in the insfrastrure to successfully release the volume. Also releases all the acquired locks.
vlmc close should be performed after a vlmc open operation.
vlmc lock <volumename>: locks a volume. This step allow the administrator to lock an archipelago volume, independently from the rest of the infrastrure.
vlmc unlock [-f] <volumename>: unlocks a volume. This allow the administrator to unlock a volume, independently from the rest of the infrastructure. The unlock option can be performed only by the blocker that acquired the lock in the first place. To unlock a volume from another blocker, -f option must be used to break the lock.
Synnefo management commands (“snf-manage”)
Each Synnefo service, Astakos, Pithos and Cyclades are controlled by the administrator using the “snf-manage” admin tool. This tool is an extension of the Django command-line management utility. It is run on the host that runs each service and provides different types of commands depending the services running on the host. If you are running more than one service on the same host “snf-manage” adds all the corresponding commands for each service dynamically, providing a unified admin environment.
To run “snf-manage” you just type:
# snf-manage <command> [arguments]
on the corresponding host that runs the service. For example, if you have all services running on different physical hosts you would do:
root@astakos-host # snf-manage <astakos-command> [argument]
root@pithos-host # snf-manage <pithos-command> [argument]
root@cyclades-host # snf-manage <cyclades-command> [argument]
If you have all services running on the same host you would do:
root@synnefo-host # snf-manage <{astakos,pithos,cyclades}-command> [argument]
Note that you cannot execute a service’s command on a host that is not running this service. For example, the following will return an error if Astakos and Cyclades are installed on different physical hosts:
root@astakos-host # snf-manage <cyclades-command> [argument]
Unknown command: 'cyclades-command'
Type 'snf-manage help' for usage.
This is the complete list of “snf-manage” commands for each service.
Astakos snf-manage commands
| Name | Description |
|---|---|
| fix-superusers | Transform superusers created by syncdb into AstakosUser instances |
| cleanup-full | Cleanup sessions and session catalog |
| commission-list | List pending commissions |
| commission-show | Show details for a pending commission |
| component-add | Register a component |
| component-list | List components |
| component-modify | Modify component attributes |
| project-control | Manage projects and applications |
| project-list | List projects |
| project-show | Show project details |
| quota | List and check the integrity of user quota |
| reconcile-resources-astakos | Reconcile resource usage of Quotaholder with Astakos DB |
| resource-export-astakos | Export astakos resources in json format |
| resource-import | Register resources |
| resource-list | List resources |
| resource-modify | Modify a resource’s default base quota and boolean flags |
| service-import | Register services |
| service-list | List services |
| service-show | Show service details |
| term-add | Add approval terms |
| user-activation-send | Send user activation |
| user-add | Add user |
| authpolicy-add | Create a new authentication provider policy profile |
| authpolicy-list | List existing authentication provider policy profiles |
| authpolicy-remove | Remove an authentication provider policy |
| authpolicy-set | Assign an existing authentication provider policy profile to a user or group |
| authpolicy-show | Show authentication provider profile details |
| group-add | Create a group with the given name |
| group-list | List available groups |
| user-list | List users |
| user-modify | Modify user |
| user-show | Show user details |
Pithos snf-manage commands
| Name | Description |
|---|---|
| reconcile-commissions-pithos | Display unresolved commissions and trigger their recovery |
| resource-export-pithos | Export pithos resources in json format |
| reconcile-resources-pithos | Detect unsynchronized usage between Astakos and Pithos DB resources and synchronize them if specified so. |
Cyclades snf-manage commands
| Name | Description |
|---|---|
| backend-add | Add a new Ganeti backend |
| backend-list | List backends |
| backend-modify | Modify a backend |
| backend-update-status | Update backend statistics for instance allocation |
| backend-remove | Remove a Ganeti backend |
| server-create | Create a new server |
| server-show | Show server details |
| server-list | List servers |
| server-modify | Modify a server |
| server-import | Import an existing Ganeti VM into synnefo |
| server-inspect | Inspect a server in DB and Ganeti |
| network-create | Create a new network |
| network-list | List networks |
| network-modify | Modify a network |
| network-inspect | Inspect network state in DB and Ganeti |
| network-remove | Delete a network |
| flavor-create | Create a new flavor |
| flavor-list | List flavors |
| flavor-modify | Modify a flavor |
| image-list | List images |
| image-show | Show image details |
| pool-create | Create a bridge or mac-prefix pool |
| pool-show | Show pool details |
| pool-list | List pools |
| pool-modify | Modify a pool |
| pool-remove | Delete a pool |
| queue-inspect | Inspect the messages of a RabbitMQ queue |
| queue-retry | Resend messages from Dead Letter queues to original exchanges |
| resource-export-cyclades | Export Cyclades resources in JSON format. |
| service-export-cyclades | Export Cyclades services in JSON format. |
| reconcile-servers | Reconcile servers of Synnefo DB with state of Ganeti backend |
| reconcile-networks | Reconcile networks of Synnefo DB with state of Ganeti backend |
| reconcile-pools | Check consistency of pool resources |
| reconcile-commissions-cyclades | Detect and resolve pending commissions to Quotaholder |
| reconcile-resources-cyclades | Reconcile resource usage of Astakos with Cyclades DB. |
Astakos helper scripts
Astakos includes two scripts to facilitate the installation procedure. Running:
snf-component-register [<component_name>]
automates the registration of the standard Synnefo components (astakos, cyclades, and pithos) in astakos database. It internally uses the script:
snf-service-export <component_name> <base_url>
which simulates the export of service and resource definitions of the standard Synnefo components.
Pithos managing accounts
Pithos provides a utility tool for managing accounts. To run you just type:
# pithos-manage-accounts <command> [arguments]
This is the list of the available commands:
| Name | Description |
|---|---|
| delete | Remove an account from the Pithos DB |
| export-quota | Export account quota in a file |
| list | List existing/dublicate accounts |
| merge | Move an account contents in another account |
| set-container-quota | Set container quota for all or a specific account |
The “kamaki” API client
To upload, register or modify an image you will need the kamaki tool. Before proceeding make sure that it is configured properly. Verify that image.url, file.url, user.url and token are set as needed:
$ kamaki config list
To change a setting use kamaki config set:
$ kamaki config set image.url https://cyclades.example.com/image
$ kamaki config set file.url https://pithos.example.com/v1
$ kamaki config set user.url https://accounts.example.com
$ kamaki config set token ...
To test that everything works, try authenticating the current account with kamaki:
$ kamaki user authenticate
This will output user information.
Upload Image
By convention, images are stored in a container called images. Check if the container exists, by listing all containers in your account:
$ kamaki file list
If the container images does not exist, create it:
$ kamaki file create images
You are now ready to upload an image to container images. You can upload it with a Pithos client, or use kamaki directly:
$ kamaki file upload ubuntu.iso images
You can use any Pithos client to verify that the image was uploaded correctly, or you can list the contents of the container with kamaki:
$ kamaki file list images
The full Pithos URL for the previous example will be pithos://u53r-un1qu3-1d/images/ubuntu.iso where u53r-un1qu3-1d is the unique user id (uuid).
Register Image
To register an image you will need to use the full Pithos URL. To register as a public image the one from the previous example use:
$ kamaki image register Ubuntu pithos://u53r-un1qu3-1d/images/ubuntu.iso --public
The --public flag is important, if missing the registered image will not be listed by kamaki image list.
Use kamaki image register with no arguments to see a list of available options. A more complete example would be the following:
$ kamaki image register Ubuntu pithos://u53r-un1qu3-1d/images/ubuntu.iso \
         --public --disk-format diskdump --property kernel=3.1.2
To verify that the image was registered successfully use:
$ kamaki image list --name-like=ubuntu
Miscellaneous
Branding
Since Synnefo v0.14, you are able to adapt the Astakos, Pithos and Cyclades Web UI to your company’s visual identity. This is possible using the snf-branding component, which is automatically installed on the nodes running the API servers for Astakos, Pithos and Cyclades.
Configuration
This can be done by modifing the settings provided by the snf-branding component to match your service identity. The settings for the snf-branding application can be found inside the configuration file /etc/synnefo/15-snf-branding.conf on the nodes that have Astakos, Pithos and Cyclades installed.
By default, the global service name is “Synnefo” and the company name is “GRNET”. These names and their respective logos and URLs are used throughout the Astakos, Pithos and Cyclades UI.
Names and URLs:
The first group of branding customization refers to the service’s and company’s information.
You can overwrite the company and the service name and URL respectively by uncommenting and setting the following:
# setting used in Astakos Dashboard/Projects pages
BRANDING_SERVICE_NAME = 'My cloud'
BRANDING_SERVICE_URL = 'http://www.mycloud.synnefo.org/'

# settings used in Astakos, Pithos, Cyclades footer only if
# BRANDING_SHOW_COPYRIGHT is set to True
BRANDING_SHOW_COPYRIGHT = True
BRANDING_COMPANY_NAME = 'Company LTD'
BRANDING_COMPANY_URL = 'https://www.company-ltd.synnefo.org/'
Copyright and footer options:
By default, no Copyright message is shown in the UI footer. If you want to make it visible in the footer of Astakos, Pithos and Cyclades UI, you can uncomment and set to True the BRANDING_SHOW_COPYRIGHT setting:
#BRANDING_SHOW_COPYRIGHT = False
Copyright message defaults to ‘Copyright (c) 2011-<current_year> <BRANDING_COMPANY_NAME>.’ but you can overwrite it to a completely custom one by setting the following option:
BRANDING_COPYRIGHT_MESSAGE = 'Copyright (c) 2011-2013 GRNET'
If you want to include a custom message in the footer, you can uncomment and set the BRANDING_FOOTER_EXTRA_MESSAGE setting. You can use html markup. Your custom message will appear above Copyright message at the Compute templates and the Dashboard UI.
#BRANDING_FOOTER_EXTRA_MESSAGE = ''
Images:
The Astakos, Pithos and Cyclades Web UI has some logos and images.
The branding-related images are presented in the following table:
| Image | Name/extension convention | Usage |
|---|---|---|
| Favicon | favicon.ico | Favicon for all services |
| Dashboard logo | dashboard_logo.png | Visible in all Astakos UI pages |
| Compute logo | compute_logo.png | Visible in all Cyclades UI pages |
| Console logo | console_logo.png | Visible in the Cyclades Console Window |
| Storage logo | storage_logo.png | Visible in all Pithos UI pages |
There are two methods available for replacing all, or individual, branding-related images:
Create a new directory inside /usr/share/synnefo/static/ (e.g. mybranding) and place there some or all of your images.
If you want to replace all of your images, keep the name/extension conventions as indicated in the above table and change the BRANDING_IMAGE_MEDIA_URL setting accordingly:
# using relative path
BRANDING_IMAGE_MEDIA_URL= '/static/mybranding/images/'

# or if you already host them in a separate domain (e.g. cdn)
BRANDING_IMAGE_MEDIA_URL= 'https://cdn.synnefo.org/branding/images/'
If you wish to replace individual images, do not uncomment BRANDING_IMAGE_MEDIA_URL, but instead provide a relative path, pointing to the file inside your directory for each BRANDING_<image>_URL that you wish to replace.
Upload some or all of your images to a server and replace each BRANDING_<image>_URL with the absolute url of the image (i.e. BRANDING_DASHBOARD_URL = 'https://www.synnefo.com/images/my_dashboard.jpg').
Note that the alternative text for each image tag inside html documents is alt=“BRANDING_SERVICE_NAME {Dashboard, Compute. Console, Storage}” respectively.
Note
Retina optimized images:
Synnefo UI is optimized for Retina displays. As far as images are concerned, retina.js is used.
Retina.js checks each image on a page to see if there is a high-resolution version of that image on your server. If a high-resolution variant exists, the script will swap in that image in-place.
The script assumes you use Apple’s prescribed high-resolution modifier (@2x) to denote high-resolution image variants on your server.
For each of the images that you wish the script to replace, you must have a high-resolution variant in the same folder named correctly and it will be detected automatically. For example if your image is in <my_directory> and is named “my_image.jpg” the script will look in the same directory for an image named “my_image@2x.jpg”.
In case that you don’t want to use a high-resolution image, the normal-resolution image will be visible.
More branding
Although, it is not 100% branding-related, further verbal customization is feasible.
EMAILS
The output of all email *.txt files will be already customized to contain your company and service names but you can further alter their content if you feel it best fits your needs as simple as creasynnefo template.
In order to overwrite one or more email-templates you need to place your modified <email-file>.txt files respecting the following structure:
- /etc/synnefo/templates/
- im/
- projects/
- registration/
Feel free to omit any of the above files you do not wish to overwrite.
Below is a list of all emails sent by Synnefo to users along with a short description and a link to their content:
- snf-astakos-app/astakos/im/templates/im/email.txt Base email template. Contains a contact email and a “thank you” message. (Link)
- snf-astakos-app/astakos/im/templates/im/activation_email.txt Email sent to user that prompts him/her to click on a link provided to activate the account. Extends “email.txt” (Link)
- snf-astakos-app/astakos/im/templates/im/invitation.txt Email sent to an invited user. He/she has to click on a link provided to activate the account. Extends “email.txt” (Link)
- snf-astakos-app/astakos/im/templates/im/switch_accounts_email.txt Email sent to user upon his/her request to associate this email address with a shibboleth account. He/she has to click on a link provided to activate the association. Extends “email.txt” (Link)
- snf-astakos-app/astakos/im/templates/im/welcome_email.txt Email sent to inform the user that his/ her account has been activated. Extends “email.txt” (Link)
- snf-astakos-app/astakos/im/templates/registration/email_change_email.txt Email sent to user when he/she has requested new email address assignment. The user has to click on a link provided to validate this action. Extends “email.txt” (Link)
- snf-astakos-app/astakos/im/templates/registration/password_email.txt Email sent for resetting password purpose. The user has to click on a link provided to validate this action. Extends “email.txt” (Link)
- snf-astakos-app/astakos/im/templates/im/projects/project_approval_notification.txt Informs the project owner that his/her project has been approved. Extends “email.txt” (Link)
- snf-astakos-app/astakos/im/templates/im/projects/project_denial_notification.txt Informs the project owner that his/her project application has been denied explaining the reasons. Extends “email.txt” (Link)
- snf-astakos-app/astakos/im/templates/im/projects/project_membership_change_notification.txt An email is sent to a user containing information about his project membership (whether he has been accepted, rejected or removed). Extends “email.txt” (Link)
- snf-astakos-app/astakos/im/templates/im/projects/project_membership_enroll_notification.txt Informs a user that he/she has been enrolled to a project. Extends “email.txt” (Link)
- snf-astakos-app/astakos/im/templates/im/projects/project_membership_leave_request_notification.txt An email is sent to the project owner to make him aware of a user having requested to leave his project. Extends “email.txt” (Link)
- snf-astakos-app/astakos/im/templates/im/projects/project_membership_request_notification.txt An email is sent to the project owner to make him/her aware of a user having requested to join his project. Extends “email.txt” (Link)
- snf-astakos-app/astakos/im/templates/im/projects/project_suspension_notification.txt An email is sent to the project owner to make him/her aware of his/her project having been suspended. Extends “email.txt” (Link)
- snf-astakos-app/astakos/im/templates/im/projects/project_termination_notification.txt An email is sent to the project owner to make him/her aware of his/her project having been terminated. Extends “email.txt” (Link)
Warning
Django templates language:
If you choose to overwrite these email templates, be mindful of the necessary information contained in django template variables that must not be omitted, such as the activation link for activating one’s account and many more. These variables are contained into {{}} inside the templates.
RabbitMQ Broker
Queue nodes run the RabbitMQ sofware, which provides AMQP functionality. To guarantee high-availability, more than one Queue nodes should be deployed, each of them belonging to the same RabbitMQ cluster. Synnefo uses the RabbitMQ active/active High Available Queues which are mirrored between two nodes within a RabbitMQ cluster.
The RabbitMQ nodes that form the cluster, are declared to Synnefo through the AMQP_HOSTS setting. Each time a Synnefo component needs to connect to RabbitMQ, one of these nodes is chosen in a random way. The client that Synnefo uses to connect to RabbitMQ, handles connection failures transparently and tries to reconnect to a different node. As long as one of these nodes are up and running, functionality of Synnefo should not be downgraded by the RabbitMQ node failures.
All the queues that are being used are declared as durable, meaning that messages are persistently stored to RabbitMQ, until they get successfully processed by a client.
Currently, RabbitMQ is used by the following components:
- snf-ganeti-eventd, snf-ganeti-hook and snf-progress-monitor: These components send messages concerning the status and progress of jobs in the Ganeti backend.
- snf-dispatcher: This daemon, consumes the messages that are sent from the above components, and updates the Cyclades DB accordingly.
Installation
Please check the RabbitMQ documentation which covers extensively the installation of RabbitMQ server and the setup of a RabbitMQ cluster. Also, check out the web management plugin that can be useful for managing and monitoring RabbitMQ.
For a basic installation of RabbitMQ on two nodes (node1 and node2) you can do the following:
On both nodes, install rabbitmq-server and create a Synnefo user:
$ apt-get install rabbitmq-server
$ rabbitmqctl add_user synnefo "example_pass"
$ rabbitmqctl set_permissions synnefo  ".*" ".*" ".*"
Also guarantee that both nodes share the same cookie, by running:
$ scp node1:/var/lib/rabbitmq/.erlang.cookie node2:/var/lib/rabbitmq/.erlang.cookie
and restart the nodes:
$ /etc/init.d/rabbitmq-server restart
To setup the RabbitMQ cluster run:
root@node2: rabbitmqctl stop_app
root@node2: rabbitmqctl reset
root@node2: rabbitmqctl cluster rabbit@node1 rabbit@node2
root@node2: rabbitmqctl start_app
You can verify that the cluster is set up correctly by running:
root@node2: rabbitmqctl cluster_status
Logging
Logging in Synnefo is using Python’s logging module. The module is configured using dictionary configuration, whose format is described here:
http://docs.python.org/release/2.7.1/library/logging.html#logging-config-dictschema
Note that this is a feature of Python 2.7 that we have backported for use in Python 2.6.
The logging configuration dictionary is defined in /etc/synnefo/10-snf-webproject-logging.conf
The administrator can have finer logging control by modifying the LOGGING_SETUP dictionary, and defining subloggers with different handlers and log levels. e.g. To enable debug messages only for the API set the level of ‘synnefo.api’ to DEBUG
By default, the Django webapp and snf-manage logs to syslog, while snf-dispatcher logs to /var/log/synnefo/dispatcher.log.
Scaling up to multiple nodes
Here we will describe how should a large scale Synnefo deployment look like. Make sure you are familiar with Synnefo and Ganeti before proceeding with this section. This means you should at least have already set up successfully a working Synnefo deployment as described in the Admin’s Installation Guide and also read the Administrator’s Guide until this section.
Graph of a scale-out Synnefo deployment
Each box in the following graph corresponds to a distinct physical node:
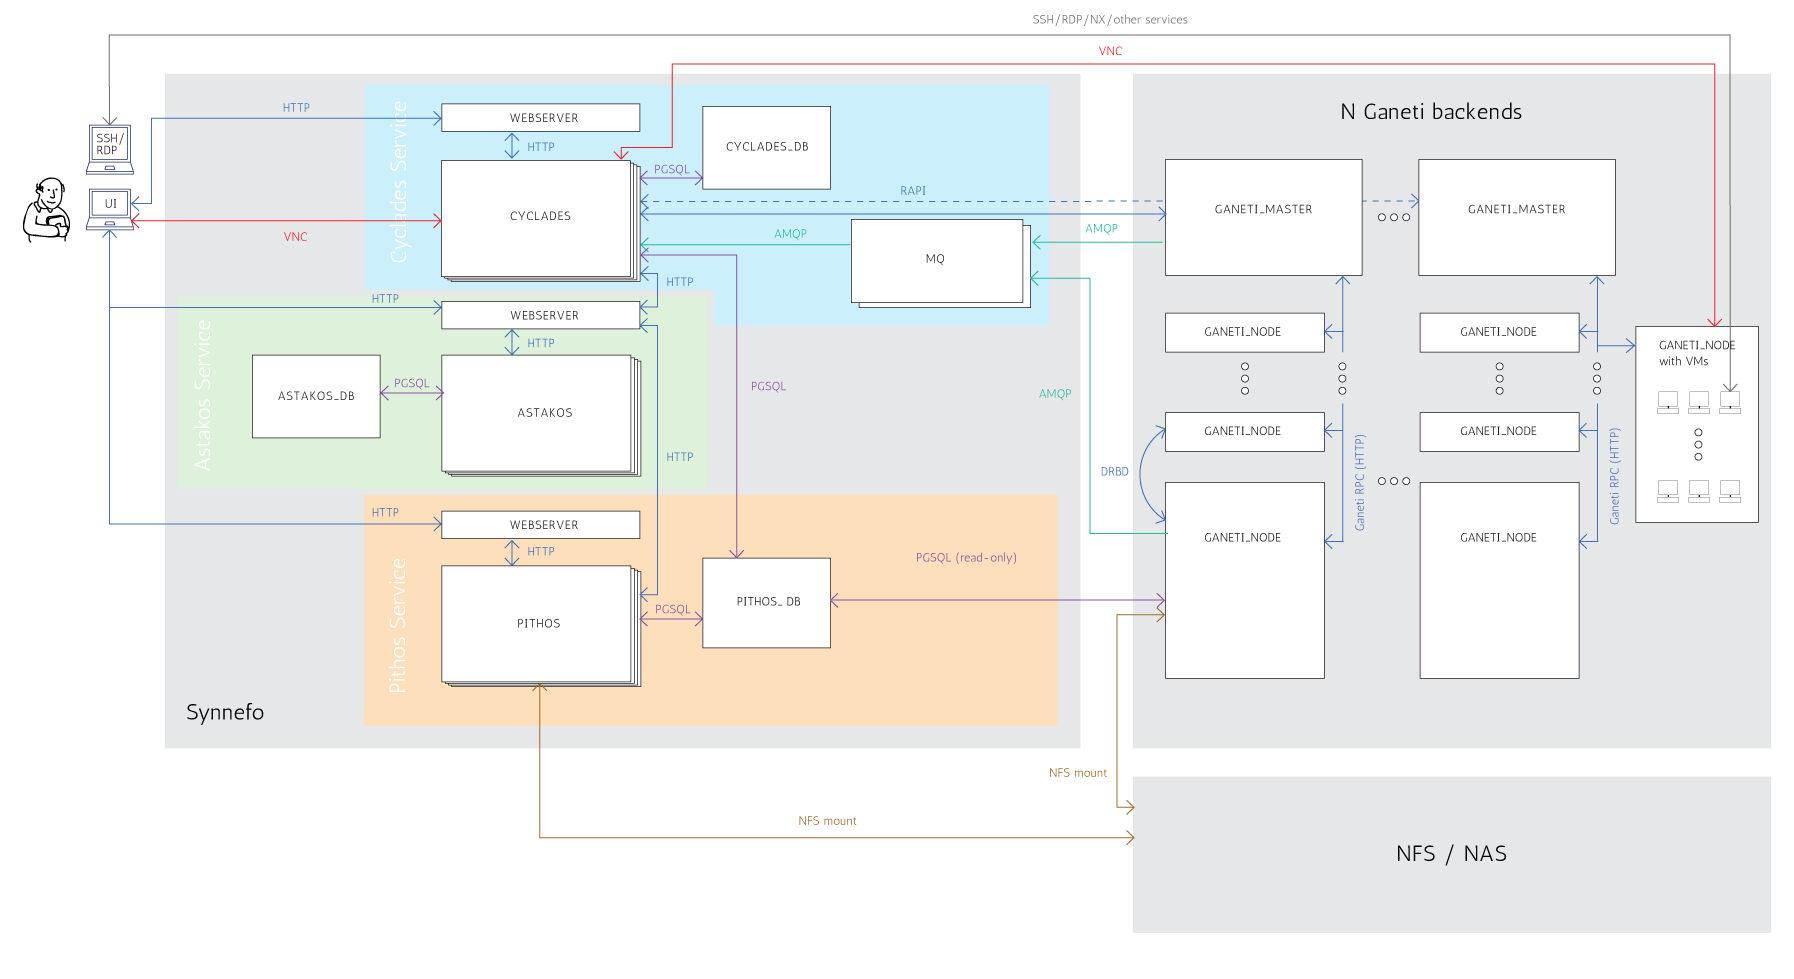
The above graph is actually the same with the one at the beginning of this guide, with the only difference that here we show the Synnefo roles of each physical node. These roles are described in the following section.
Physical Node roles
As appears in the previous graph, a scale-out Synnefo deployment consists of multiple physical nodes that have the following roles:
- WEBSERVER: A web server running in front of gunicorn (e.g.: Apache, nginx)
- ASTAKOS: The Astakos application (gunicorn)
- ASTAKOS_DB: The Astakos database (postgresql)
- PITHOS: The Pithos application (gunicorn)
- PITHOS_DB: The Pithos database (postgresql)
- CYCLADES: The Cyclades application (gunicorn)
- CYCLADES_DB: The Cyclades database (postgresql)
- MQ: The message queue (RabbitMQ)
- GANETI_MASTER: The Ganeti master of a Ganeti cluster
- GANETI_NODE : A VM-capable Ganeti node of a Ganeti cluster
You will probably also have:
CMS: The CMS used as a frotend portal for the Synnefo services
NS: A nameserver serving all other Synnefo nodes and resolving Synnefo FQDNs
- CLIENT: A machine that runs the Synnefo clients (e.g.: kamaki, Web UI),
most of the times, the end user’s local machine
From this point we will also refer to the following groups of roles:
- SYNNEFO: [ ASTAKOS, ASTAKOS_DB, PITHOS, PITHOS_DB, CYCLADES, CYCLADES_DB, MQ, CMS]
- G_BACKEND: [GANETI_MASTER, GANETI_NODE]
Of course, when deploying Synnefo you can combine multiple of the above roles on a single physical node, but if you are trying to scale out, the above separation gives you significant advantages.
So, in the next section we will take a look on what components you will have to install on each physical node depending on its Synnefo role. We assume the graph’s architecture.
Components for each role
When deploying Synnefo in large scale, you need to install different Synnefo or/and third party components on different physical nodes according to their Synnefo role, as stated in the previous section.
Specifically:
- Role WEBSERVER
- Synnefo components: None
- 3rd party components: Apache
- Role ASTAKOS
- Synnefo components: snf-webproject, snf-astakos-app
- 3rd party components: Django, Gunicorn
- Role ASTAKOS_DB
- Synnefo components: None
- 3rd party components: PostgreSQL
- Role PITHOS
- Synnefo components: snf-webproject, snf-pithos-app, snf-pithos-webclient
- 3rd party components: Django, Gunicorn
- Role PITHOS_DB
- Synnefo components: None
- 3rd party components: PostgreSQL
- Role CYCLADES
- Synnefo components: snf-webproject, snf-cyclades-app, snf-vncauthproxy
- 3rd party components: Django Gunicorn
- Role CYCLADES_DB
- Synnefo components: None
- 3rd party components: PostgreSQL
- Role MQ
- Synnefo components: None
- 3rd party components: RabbitMQ
- Role GANETI_MASTER
- Synnefo components: snf-cyclades-gtools
- 3rd party components: Ganeti
- Role GANETI_NODE
- Synnefo components: snf-cyclades-gtools, snf-network, snf-image, nfdhcpd
- 3rd party components: Ganeti
- Role CMS
- Synnefo components: snf-webproject, snf-cloudcms
- 3rd party components: Django, Gunicorn
- Role NS
- Synnefo components: None
- 3rd party components: BIND
- Role CLIENT
- Synnefo components: kamaki, snf-image-creator
- 3rd party components: None
Example scale out installation
In this section we describe an example of a medium scale installation which combines multiple roles on 10 different physical nodes. We also provide a guide to help with such an install.
We assume that we have the following 10 physical nodes with the corresponding roles:
- Node1:
- WEBSERVER, ASTAKOS
- Guide sections:
- Node2:
- WEBSERVER, PITHOS
- Guide sections:
- Node3:
- WEBSERVER, CYCLADES
- Guide sections:
- Node4:
- WEBSERVER, CMS
- Guide sections:
- Node5:
- ASTAKOS_DB, PITHOS_DB, CYCLADES_DB
- Guide sections:
- Node6:
- Node7:
- GANETI_MASTER, GANETI_NODE
- Guide sections:
- Node8:
- GANETI_NODE
- Guide sections:
- Node9:
- GANETI_NODE
- Guide sections:
- Same as Node8
- Node10:
- GANETI_NODE
- Guide sections:
- Same as Node8
All sections: Scale out Guide